
Create professional product catalogs with our drag-and-drop page builder.
The Catalog Designer is where you build, customize, and publish your catalogs. Combine products, text, images, and layouts into polished PDF and online catalogs.
Quick Start
- Go to Catalogs → Click New Catalog
- Choose a starting point (template, blank, or layout)
- Design pages with drag-and-drop elements
- Configure settings (page size, margins)
- Preview and publish as PDF or online catalog
Creating a New Catalog
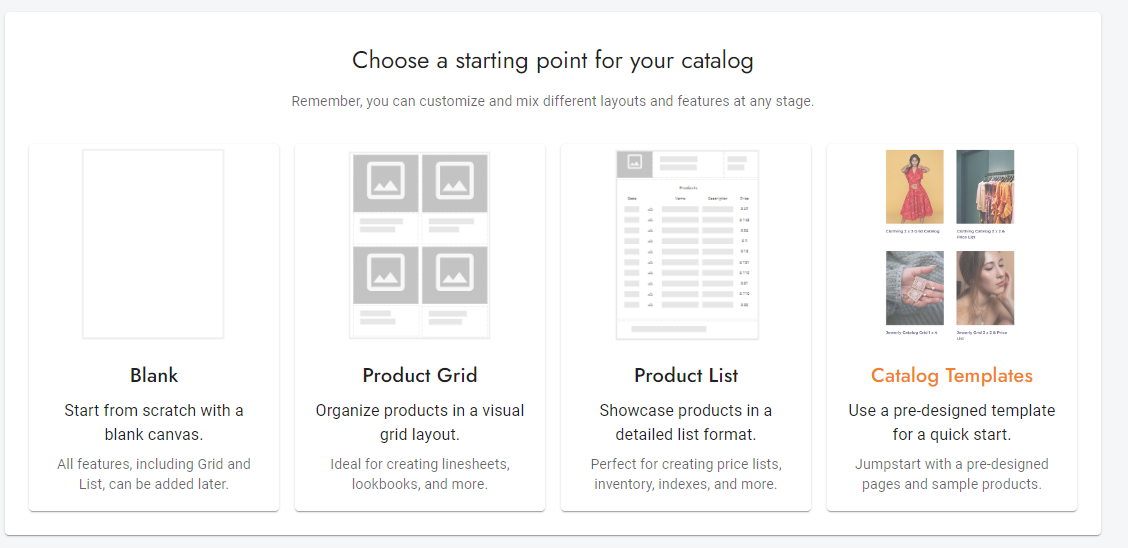
Starting options:
- Templates: Pre-designed catalogs to customize
- Layouts: Start with a specific page layout
- Blank: Empty catalog for full creative control
- AutoGrid: Jump straight to product grid creation
Designer Interface
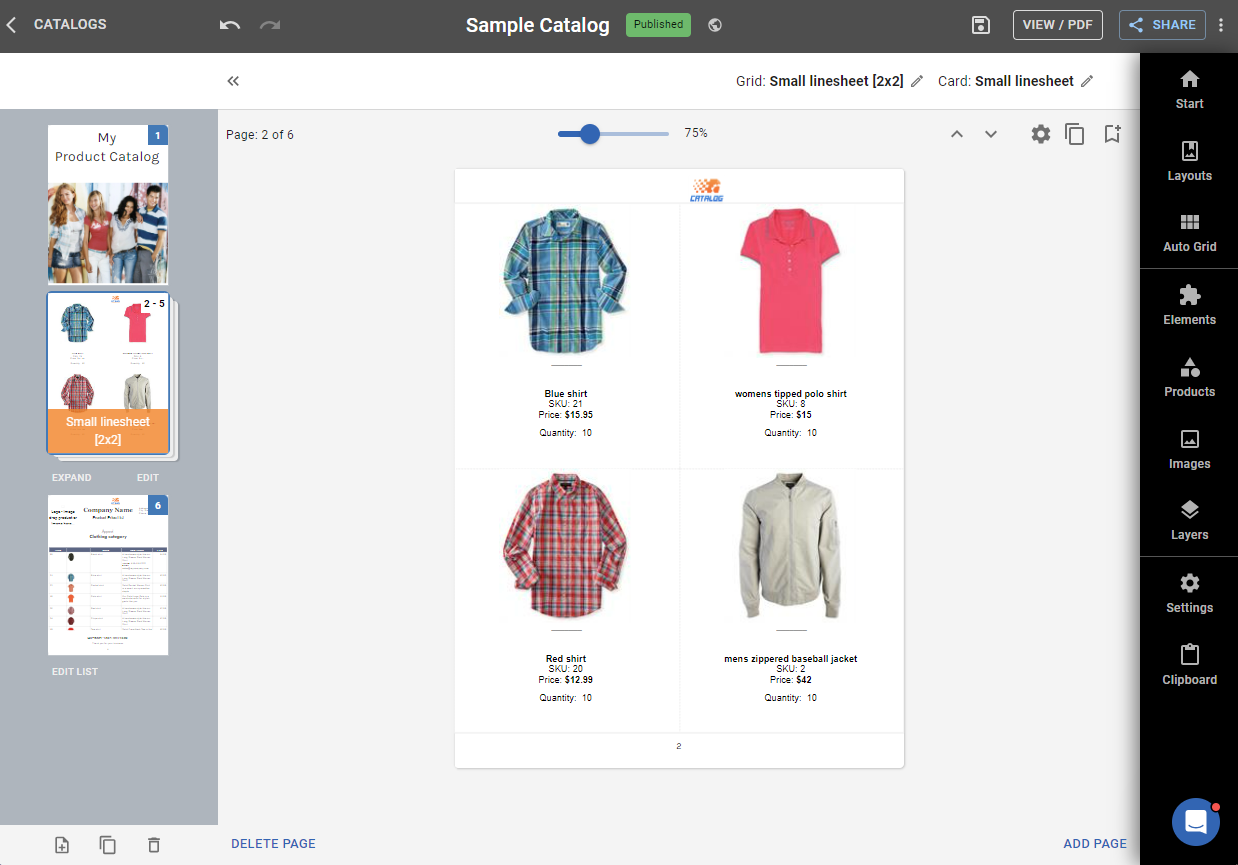
Main Areas
| Area | Purpose |
|---|---|
| Page List (left) | Navigate and manage pages |
| Canvas (center) | Design your pages |
| Sidebar (right) | Elements, products, images, settings |
| Toolbar (top) | Actions, zoom, View / PDF |
Page Management
- Add pages: Click Add button for page types
- Reorder: Drag pages in the list
- Duplicate: Right-click → Duplicate
- Delete: Right-click → Delete
Page Types
| Page Type | Purpose |
|---|---|
| Page | Standard design page |
| Cover | Add from Add → Layouts → Cover, or drag any page to the top of the Page List to make it page 1 |
| AutoGrid | Multi-page product grids |
| Product List | Tabular product data |
| Table of Contents | Add → Layouts → Global ToC or Section ToC. Auto-generated index from page titles. See "Table of Contents (Index)" section below |
| Sub Catalog | Embed another catalog's pages |
A book-style catalog (cover, one product per page with its description, back cover) is built from layouts in the designer, no AI needed: add a cover from Add → Layouts, then a Hero product layout page for each product (it shows one product large with its description), and finish with Back Cover with postal if the catalog is mailed. Step-by-step: Make a book-style catalog.
Adding Images to a Page
Open the Images tab in the right sidebar to see your uploaded image library. Drag any image onto the page, or click it to place it. Use the Upload button in that panel to add new images without leaving the designer (you can also manage them under Products → Images).
Catalog Builder (Assembly View)
The Catalog Builder is a separate full-screen view that shows your catalog as semantic blocks (Cover, Grids, Price Lists, Custom Pages) instead of individual page thumbnails. It provides a high-level overview of catalog structure.
How to open: Click the Build button in the Designer toolbar.
Catalog Builder vs Designer:
| Feature | Catalog Builder | Catalog Designer |
|---|---|---|
| View | Blocks (semantic sections) | Individual pages |
| Purpose | Organize catalog structure | Design page content |
| Editing | Add/reorder/delete blocks, pick layouts | Drag-and-drop elements on pages |
| Best for | Planning and restructuring | Detailed design and text editing |
What you can do in the Catalog Builder:
- Add content: New Grid, New Price List, Add Layout (pre-designed page templates)
- Reorganize: Reorder, duplicate, or delete blocks
- Edit inline: Click template or collection chips to change them without leaving the Builder
- Set active page: Click a block to set where new content will be inserted
- Open in Designer: Use the hover action to jump to a specific block in the Designer for detailed editing
When to use which:
- Use Catalog Builder when you want to see the big picture, add sections, or reorganize your catalog
- Use Catalog Designer when you want to edit page content — add text, images, change fonts, colors, or position elements
Tip: To add your company name or other text to a page, you'll need to be in the Catalog Designer (not the Builder). Either click "Open in Designer" on a block, or click the Back button to return to the Designer, then drag a Text element onto your page.
Catalog Settings
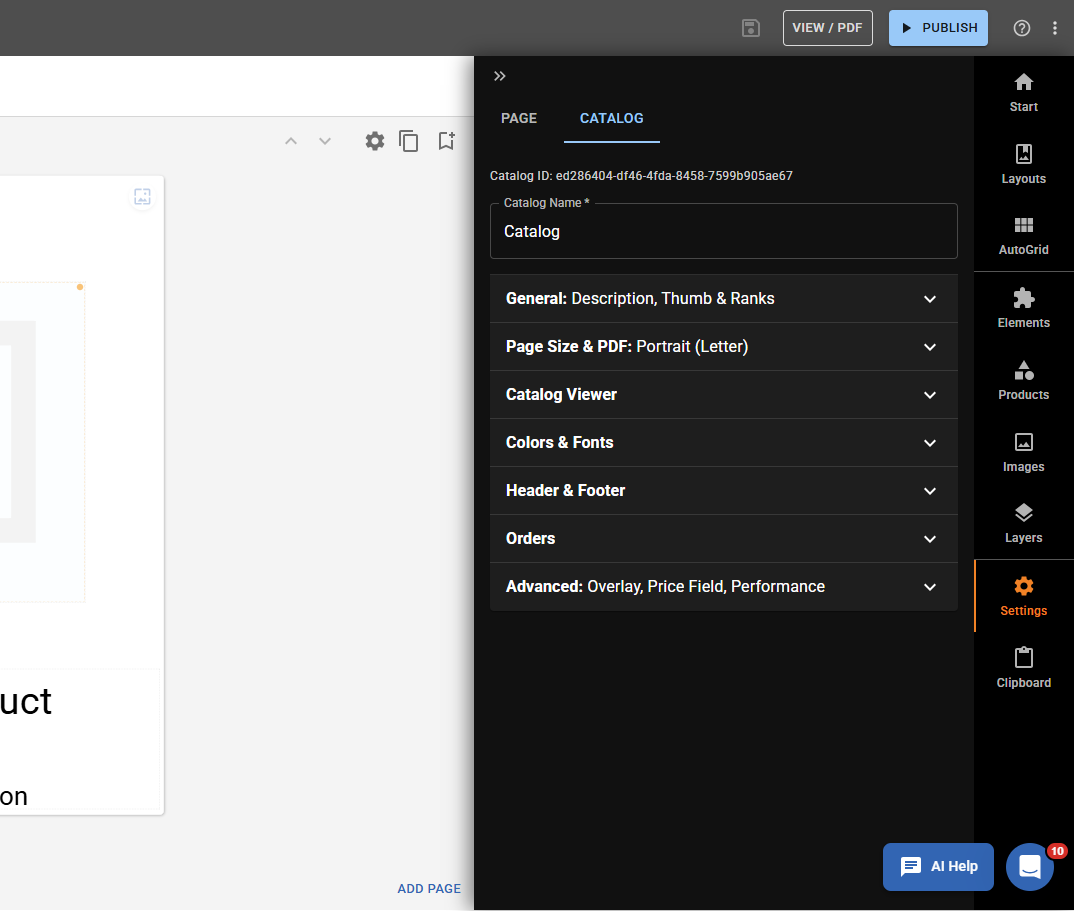
Access settings via the Settings button (gear icon).
Page Size & PDF Settings
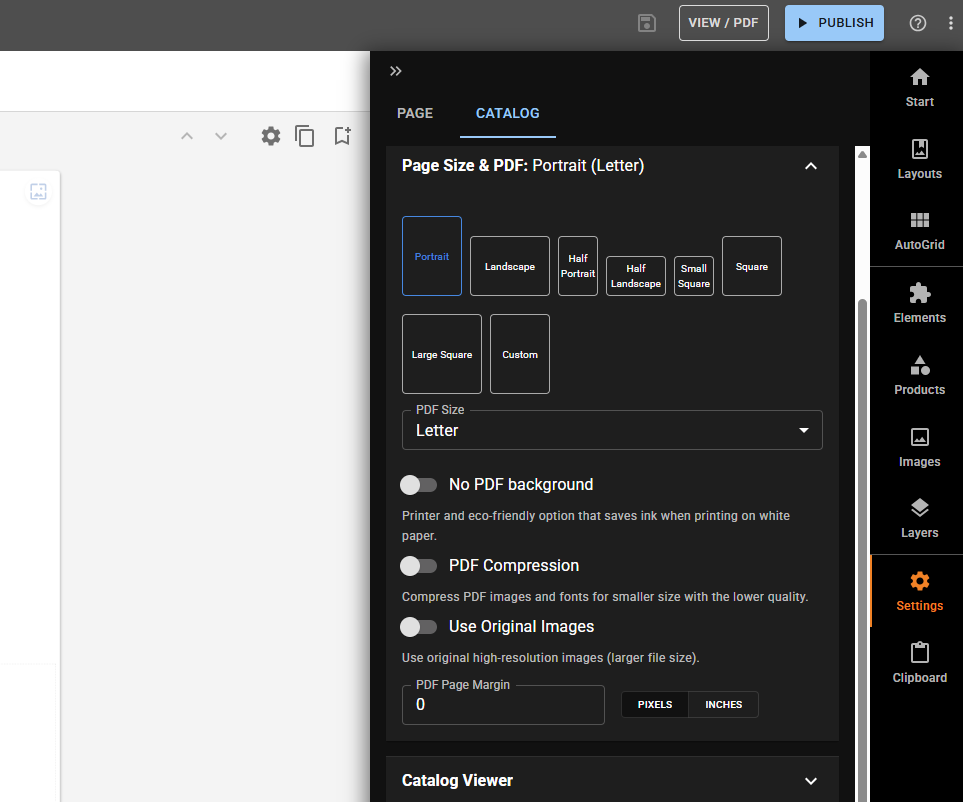
Page Size:
- Standard sizes: A4, Letter, Legal
- Custom dimensions for special needs
- Orientation: Portrait or Landscape
PDF Options:
| Setting | Purpose |
|---|---|
| PDF Page Margin | Add uniform margin around content (pixels or inches) |
| No PDF Background | Removes page background colors from the PDF, saves ink |
| PDF Compression | Smaller file size, lower quality |
| Use Original Images | High-resolution, larger file |
| Scale design to PDF page | Scales the whole design, text included, to fill the page — turn on if the PDF doesn't match the online view |
| Bleed | For a print shop: extends every page past the cut line so backgrounds print to the edge |
| Crop marks | Corner marks that show the printer where to cut (appears once Bleed is on) |
Print tip: Standard print margins are 0.25" - 0.5" (6-13mm). Sending the PDF to a print shop? See Bleed and crop marks below.
Bleed and crop marks (for a print shop)
A print shop trims each sheet after printing. If a background stops exactly at the page edge, a slightly off cut leaves a thin white line. Bleed fixes this: the PDF page grows on every side, your page keeps its exact size inside the cut line, and the page background, the background image and any box touching the page edge run out into the extra band.
- Set Bleed to what your printer asks for. 1/8 inch (3 mm) is the usual; the choices go up to 1 inch.
- Turn on Crop marks if the printer wants them. Short black lines at each corner show where to cut.
- Generate the PDF and send it as is. Do not resize it when printing.
Good to know:
- Bleed is off by default, so normal PDFs are unchanged.
- With a PDF Page Margin set, your boxes stay inside the margin and only the page background runs into the bleed.
- Keep text and logos at least 1/8 inch inside the page edge; anything closer may be trimmed.
- Bleed is a PDF setting only. Your online catalog does not change.
Other Settings
- Catalog Name: Display name and URL slug. This is where you rename a catalog: open the catalog, click Settings (gear icon) in the right panel, and edit the Catalog Name field at the top. It can be changed at any time after the catalog is created.
- Thumbnail: Cover image for catalog list
- Theme: Colors and fonts (Colors & Fonts accordion)
- Headers/Footers: Recurring content on pages with dynamic fields
Fonts
Pick fonts from the built-in Colors & Fonts list (catalog Theme). International (non-Latin) fonts are available on paid plans — turn on Account → Admin tab → "Enable international fonts (paid plans only)". Catalog Machine does not support uploading your own font files (TTF/OTF/WOFF); choose from the built-in list, which embeds correctly in the generated PDF.
Headers & Footers (Page Numbers)
Add page numbers or other recurring content via Settings → Header & Footer accordion:
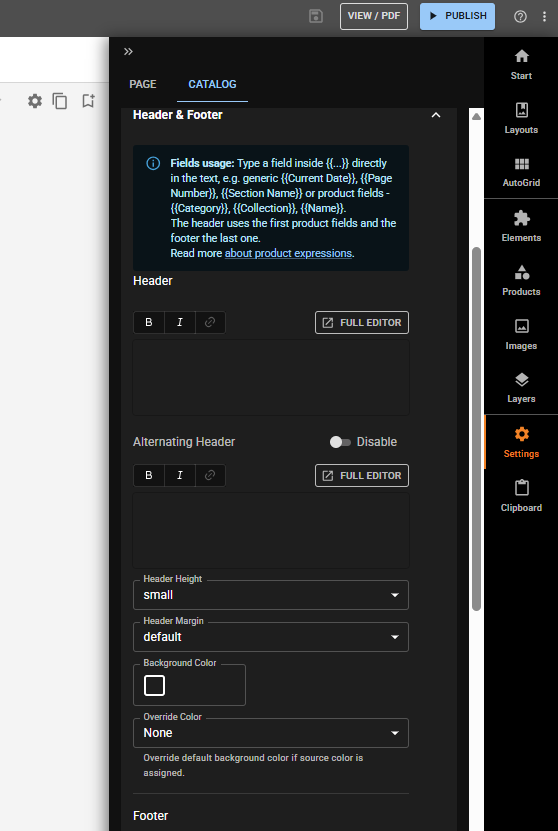
- Open catalog Settings (gear icon)
- Expand Header & Footer section
- Enter content with dynamic expressions
- Configure whether to include on first/last pages
The header and footer are full rich-text editors, not plain text boxes. Each one has the standard formatting toolbar, and that includes an Insert image button — so a logo or banner that repeats on every page goes straight into the header; you do not need to build a Layout for it. Separate Header and Footer boxes, each with an Alternating variant for left/right pages, plus height, margin and background colour.
Recurring does not mean identical on every page. The Alternating boxes render on even-numbered pages and the main Header/Footer on odd ones, and the first/last-page switches above skip pages too. So "the logo is only on some pages" points at these settings, not away from them — check the Alternating box and those switches before looking at Layouts or page elements.
Fields usage: Type a field inside {{...}} directly in the text. Generic fields: {{Current Date}}, {{Page Number}}, {{Section Name}}. Product fields: {{Category}}, {{Collection}}, {{Name}}, and any other product field.
The header uses the first product's fields on the page and the footer uses the last one.
Common page number formats:
{{Page Number}}→ "3"Page {{Page Number}}→ "Page 3"
Catalog Viewer Settings
Customize the online catalog experience:
| Setting | Purpose |
|---|---|
| Thumb Navigation | How page thumbnails display (side, bottom, none) |
| Start Viewing Mode | Initial view (slider, double page, etc.) |
| Background Color | Viewer background color |
| Background Image | Custom background image |
Orders Settings
- Enable catalog orders: Allow visitors to submit order requests
- Orders Email: Override account default email for this catalog
Preview & Export
Preview
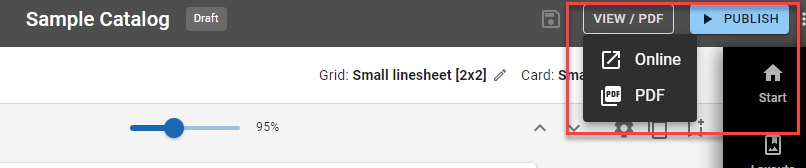
Click View / PDF in the top toolbar, then Online, to see your catalog as viewers will see it. There is no button labelled "Preview".
PDF Export
Click View / PDF in the top toolbar, then PDF, to generate a downloadable PDF (high-quality, print-ready, with compression options).
Custom PDF Settings (at generation time)
When you choose PDF, a dialog opens with a Settings accordion. You can override any PDF setting for a one-time export — without changing your catalog's saved settings:
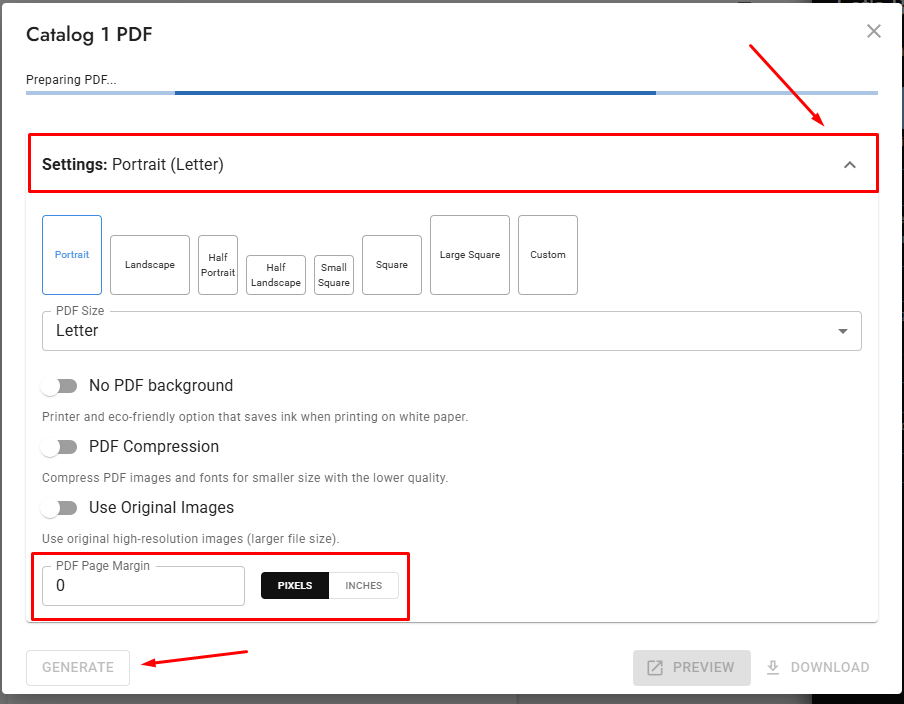
Overridable settings:
| Setting | Purpose |
|---|---|
| Page Size | Change page dimensions (A4, Letter, Custom) for this PDF only |
| No PDF Background | Removes page background colors from the PDF, saves ink |
| PDF Compression | Smaller file size with lower image quality |
| Use Original Images | High-resolution images (larger file) |
| PDF Page Margin | Add uniform margin around all pages (pixels or inches) |
| Scale design to PDF page | Scales the whole design, text included, to fill the selected page size |
| Bleed / Crop marks | Print-shop bleed and cut marks for this PDF only (see Bleed and crop marks above) |
⚠️ "Scale design to PDF page" is the fix for a PDF that does not match the online view. If text comes out smaller than its box, sits in the wrong place, or the layout looks shifted compared with the designer, turn this on and generate again. It is off by default, so a catalog that looks right on screen can still export wrong, and nothing on the page says why. This is not a broken layout: do not rebuild pages or re-place elements before trying this switch.
How to use:
- Open your catalog in the Designer
- Click View / PDF in the top toolbar, then PDF
- Expand the Settings accordion in the PDF dialog
- Adjust any settings (page size, compression, margin, etc.)
- Click Generate to create the PDF with custom settings
Important behavior:
- Changing any setting switches to "Custom" mode — your catalog defaults are not affected
- Click Reset to go back to your catalog's saved settings
- Click Save as default to apply the custom settings permanently to the catalog
- The PDF Page Margin supports both pixels and inches (toggle between them)
Print tip: Standard print margins are 0.25" – 0.5" (6–13mm). The margin is added uniformly around all sides of each page. For a print shop, ask which Bleed they need (usually 1/8 inch) and whether they want Crop marks.
Online Catalog
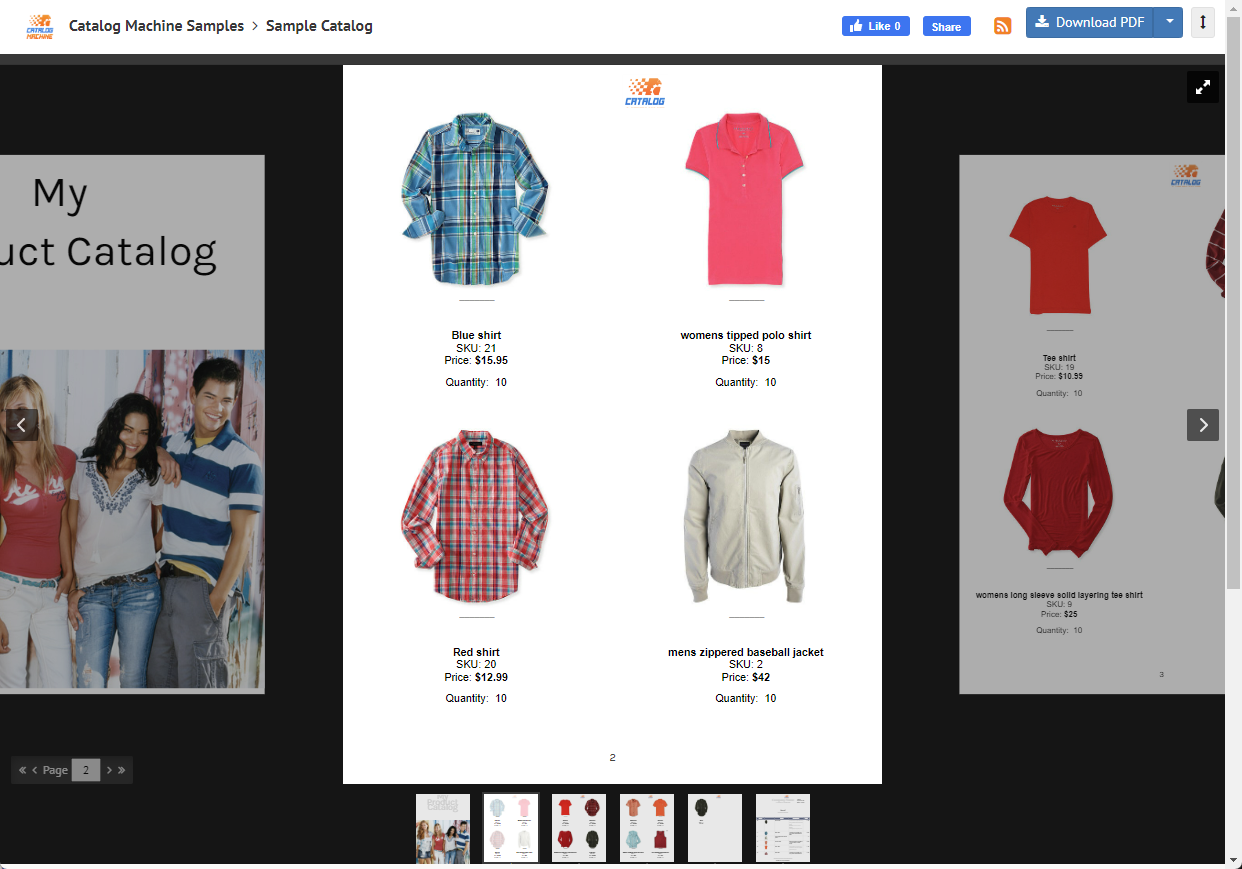
Publish as an interactive online catalog: a full-screen, page-by-page viewer with thumbnails, swipe and keyboard navigation, that fits any screen including phones. Pages slide from one to the next (there is no paper page-curl / flipbook animation).
Share link: https://www.catalogmachine.com/your-namespace/catalogs/your-catalog-permalink.html (or .pdf)
your-namespace is your Catalog Site Namespace, set at Account > Business — it is not your Business Name, and editing the business name won't change it. It can be renamed there, but ⚠️ that breaks every link you have already shared. See Catalog Site Namespace in the Account section of the platform overview.
Troubleshooting: "PDF is not available" or the PDF won't update
- You can view the catalog online but the PDF says "PDF is not available": a draft (unpublished) catalog only has a downloadable PDF while you are logged in — the public download link isn't generated until you publish the catalog. Publish it (catalog Settings → Publish), or send the viewer your logged-in/preview link.
- You just published and the PDF still says "PDF is not available": the print-ready PDF renders a moment after publishing. Wait a few seconds, refresh the page, then download again.
- You regenerated the PDF but print/download still shows the old version: rebuild it from the catalog itself — open the catalog and use View / PDF → PDF → regenerate (then download again). You do not need Zapier or the API for a normal refresh; those are only for automating rebuilds after an import. Your own Preview and Download are never served from a cache, so what you see is what the catalog currently is.
- You replaced an image and the PDF still shows the old one: regenerate the PDF. Changing an image invalidates the stored PDF automatically, so the next generation picks the new picture up. Renaming the image file is not needed.
- Someone you shared the link with still downloads an older PDF: open the catalog's PDF dialog and click the refresh icon (hover: Refresh the shared link), then ask them to download again. Generating a PDF already refreshes that shared copy, so this is only for a link shared before the last rebuild. A recipient's own browser can also hold the file for about ten minutes, which no refresh on our side can reach.
- Showrooms have their own separate Enable PDF download toggle in Showroom settings — that's unrelated to a catalog's own PDF.
Embedding
Show a catalog inside your own website or store (paid plans): on the Catalogs page, click Share on the catalog and copy the Embed HTML code (an <iframe>). Pick the Catalog Navigation style next to it, then paste the code into the HTML of your page - on Shopify, Online Store → Pages, switch the editor to HTML (<>) and paste. The embedded catalog updates by itself each time you publish.
Showing the page only to logged-in customers is a setting of your website, not of Catalog Machine (on Shopify, a theme change).
Privacy & Who Can View
Each catalog has its own privacy level (set in catalog Settings → Publish):
| Level | Who can view | Search engines | Listed in your other catalogs |
|---|---|---|---|
| Public | Anyone with the link | Submitted (Google, Bing) | Yes |
| Direct | Anyone with the link | Not submitted | Yes |
| Hidden | Anyone with the link | Not submitted | No |
| Password | Anyone with the access code (Pro plan) | No | No |
| Anyone who enters their email (Pro plan) | No | No |
- To keep a catalog away from competitors while still sharing it by link, use Hidden — it stays out of search engines and your public catalog listing, but the link still works.
- Hidden ≠ access control. Hidden only blocks discovery (search + your listing) — the link itself still opens for anyone who has it. To control who can open it — confidential or dealer-only pricing that must not be downloaded by the wrong people — use Password or Email. Those are the only levels that actually restrict access.
- Already showing in Google? Changing the privacy level stops future indexing, but pages Google already cached can linger for days until it re-crawls — they don't disappear instantly. To remove them faster, submit a removal request in Google Search Console. (This is separate from the app's own quick cache, which clears in a minute.)
- Direct vs Public: both stay listed among your other catalogs; the only difference is Public is submitted to search engines and Direct is not. Setting a catalog to Direct does not remove it from sibling catalogs' "other catalogs" footer — that's by design; use Hidden for that.
- Showrooms use the same levels, except level 2 is called Closed (fully private — visible only to you) instead of Hidden.
Advanced Features
Clipboard (Copy & Paste Pages/Elements)
Copy pages or elements from one catalog and paste them into another using the Clipboard:
Copy a page:
- Open the source catalog in the Designer
- Select the page you want to copy (don't select any elements on it)
- Click the Copy button in the page toolbar — the page is added to the Clipboard
Copy an element:
- Select one or more elements on a page
- Click the Copy button — selected elements are added to the Clipboard
Paste into another catalog:
- Open the destination catalog in the Designer
- Open the Clipboard tab in the sidebar
- Pages: Click a copied page thumbnail to insert it into the catalog
- Elements: Drag a copied element onto your page
Clipboard vs Layouts: The Clipboard is for one-off copying between catalogs. For reusable page designs you want to apply many times, save the page as a Layout instead: click the save page as layout button (bookmark icon) in the page toolbar, next to page settings and copy, name it and click Save; it appears under My Layouts in the Layouts tab. This works on Card Grid pages too, so a designed grid page never has to be rebuilt to become a layout. Only generated pages (tables of contents, sub-catalogs) can't be saved.
Reusing a layout with different images (e.g. category covers): A layout includes whatever you place in it, so an image added inside a layout repeats on every page that uses it. For a different image per page, leave the layout's image as an empty placeholder and add the specific image on each page after the layout is applied.
Note: The Clipboard is in-memory only — it clears when you close the browser tab. Copy and paste in the same session.
Duplicating Catalogs
Duplicate a catalog to create variations:
What's INDEPENDENT (safe to change):
- Pages and page layouts
- Element positioning
- Catalog name and settings
- Text content on pages
What's SHARED (changes affect BOTH):
- Products - Same database records
- Collections - Product Lists show same products
- Product Cards - Card edits update everywhere
⚠️ For truly independent versions:
- Duplicate products for different prices
- Create separate collections for different selections
- Duplicate Product Cards for different layouts
Sub Catalogs (Embedding)
Combine multiple catalogs into one master catalog:
- Click Add → Layouts → Embed catalog
- Select another catalog to include
- Master displays pages from sub-catalogs
- Sub-catalog updates reflect in master automatically
Use for: Large catalogs built from smaller sections, or reusing common sections across catalogs.
Table of Contents (Index)
Two ways to create an index or table of contents:
Method 1: Auto-Generated ToC Page
- Click Add → Layouts → Choose Global ToC or Section ToC
- ToC auto-populates from page titles and updates when pages change
- Global ToC lists all pages; Section ToC lists pages within a section
Method 2: Product Index via Product List
Use a Product List with the {{Product Page Link}} field to create a product index with clickable links to product pages in the catalog.
- Click Add → Layouts → Choose Product Category Index or Product Index layout
- The layout includes product names with page links to where each product appears
- Customize columns (Name, Category, Code, Price, page link) in the Product List Editor
When to use which:
- ToC — for page-level navigation (e.g., sections like "Electronics", "Clothing")
- Product Index — for product-level navigation (e.g., alphabetical product list with page numbers)
Troubleshooting
My catalog changes aren't appearing on the public link
Public catalog content is cached for performance, but you are never the one being shown a cached copy. Signed in as the owner, the online catalog and your own PDF download are always current. What can lag is what a visitor sees:
- HTML page (
yourcatalog.html): cached server-side up to 30 minutes for anonymous visitors. - PDF link (
yourcatalog.pdf): the file regenerates asynchronously after you save, taking a few seconds to about a minute depending on catalog size. After that, a recipient's own browser may keep the copy it already downloaded for about ten minutes. - Images replaced under the same filename do not lag. Image links carry a version marker, so a replacement is picked up immediately. See Image Management.
If a visitor still reports an old version:
- Give the PDF a moment. Regeneration is asynchronous, so re-download about a minute after saving.
- Refresh the shared link. In the catalog's PDF dialog, click the refresh icon (hover: Refresh the shared link). Generating a PDF already does this, so it only matters for a link shared before the last rebuild.
- Ask them to hard refresh (
Ctrl+Shift+RWindows,Cmd+Shift+RMac) or open the link in a private window. A copy already in someone's browser cannot be cleared from our side. - Check it as a visitor would: add
?preview=123(any number) to the URL, using a different number each time you re-check.https://www.catalogmachine.com/your-namespace/catalogs/your-catalog.pdf?preview=123 - Force regeneration: Unpublish + republish, or trigger a Rebuild from the catalog menu (or via the REST API
GET /catalogs/{permalink}/rebuild).
Visitors who do nothing will pick up an updated HTML page within ~30 minutes.
Common Questions
Q: How do I rename a catalog? A: Open the catalog, click Settings (gear icon) in the designer's right panel, and edit the Catalog Name field at the top of that panel. There is no rename option on the catalog list or on a right-click menu, which is why it is easy to miss.
Q: How do I change print margins? A: Go to Settings → Page Size & PDF → adjust PDF Page Margin (pixels or inches).
Q: My printer asks for bleed and crop marks. Can Catalog Machine do that? A: Yes. In the PDF settings (catalog Settings or the Settings accordion in the PDF dialog), set Bleed (1/8 inch is the usual), turn on Crop marks, and generate the PDF. Your pages keep their size inside the cut, and backgrounds run past it.
Q: How do I add clickable links?
A: Select text → Click link icon (🔗) in toolbar → Enter URL. Works with static URLs or product fields like {{Store Link}}.
Q: Can images have click actions? A: No, images cannot have direct click actions. Place a text link near or over the image instead.
Q: Why did my AutoGrid pages become disconnected? A: Major edits (renaming grid, changing size/card) break the connection. Delete pages and regenerate.
Q: Can I have multiple catalogs share the same products? A: Yes! Products exist in your database and can appear in unlimited catalogs.