
Catalog Machine's CSV import allows you to:
-
Import new products and variants from spreadsheets
-
Update existing product information in bulk
-
Add products to categories and collections
-
Import product images from various sources
-
Extend products with custom fields
Quick Start Guide
Variant Import Format
To import products with variants, use one row per variant with the same Code. Prefix variant-specific columns with Variant: - the space after the colon is required:
Code,Name,Price,Variant: Size,Variant: Color,Variant: Price
SHIRT-1,"Blue Shirt",25.00,"M","Blue",28.99
SHIRT-1,"Blue Shirt",25.00,"L","Red",29.99
SHIRT-2,"Red Pants",35.00,,,
- Same
Code= same parent product (variants appear as options) - Products without variants: leave
Variant: *columns empty - ⚠
Variant:Size(no space) is not recognised as a variant column. The import still succeeds, but the column lands as an ordinary product field and every row after the first is merged into the parent product, so the variants silently disappear. Easiest way to get the header exactly right: export your products to CSV first and reuse its header row. - Built-in variant fields (these are the only ones):
Variant: Image,Variant: SKU,Variant: Price,Variant: Description,Variant: External Id,Variant: Barcode,Variant: Quantity. There is one image per variant - there is noVariant: ImageFront/Variant: ImageBack. For a second picture, add another Image-type field to the product's category (e.g. "Image 2") and fill it at product level. - Variant option columns are anything else you name:
Variant: Size,Variant: Color,Variant: Design, etc. Each becomes a selectable option on the product. - Free accounts are limited to 5 variants per product; the import reports the products it had to truncate.
Common Scenarios
-
Import from Excel
-
Import → CSV in Catalog Machine
-
Upload the
.xlsxor.xlsfile as it is - no need to save it as CSV first -
Follow the prompts (see Excel files below for what is read from a workbook)
-
Import from Google Sheets
-
Open your spreadsheet
-
File → Download → CSV
-
Import → CSV in Catalog Machine
-
Upload downloaded file
-
Update Existing Products
-
Export current products as CSV
-
Edit in Excel/Google Sheets
-
Save as CSV
-
Re-import to update
Watch this short 3-minute video for an overview of the steps for importing products from CSV (Excel / Google)
Before You Start
Requirements
-
CSV or Excel (
.xlsx,.xls) file with product data -
First row must have field names that match your category fields (e.g., "Description" column for description field, new fields will be suggested during import)
-
Column headers are NOT case-sensitive -
Name,name, andNAMEall work -
Namefield is required for new products -
Use
Codefield to match and update existing products -
Other fields are optional
Tip: Struggling with CSV format? Try the AI Concierge instead - just paste or describe your products in any format and it will parse them for you. → Open AI Import
Important: Code acts as your unique product identifier/key
-
Best practice: Use your existing product IDs, SKUs, or other stable identifiers
-
If Code matches an existing product, it will update that product
-
If no match found, creates new product
-
If not provided, system will auto-generate (not recommended for future updates)
Data Preparation Tips
-
Review your product information structure
-
Prepare high-quality product images
-
Plan your category and collection structure
Need more options? Check the detailed sections below.
Step-by-Step Import Process
1. Prepare Your File
- Use CSV or Excel (
.xlsx,.xls) format
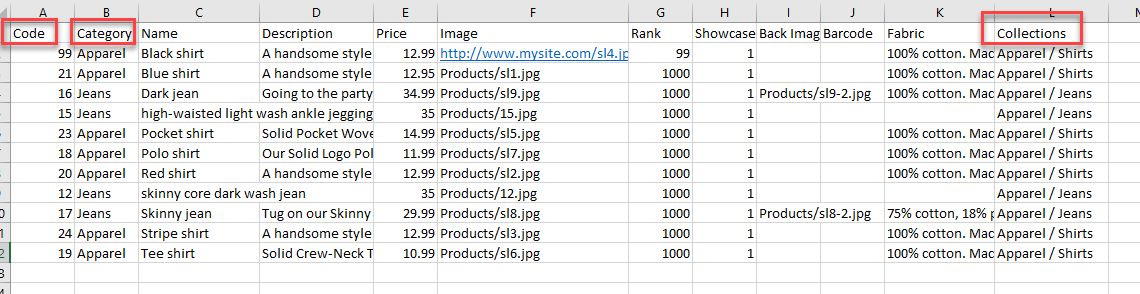
-
Include header row
-
If
Codefield is present and matching product is found, it will be updated, Otherwise inserted -
Every new product needs a category. It can come from a
Categorycolumn, from the default category you pick before the import, or from the choice the analysis step offers when the file has none (see step 3) -
For CSV, save with UTF-8 encoding (an Excel file needs no encoding step)
2. Start Import
Navigate to Import → CSV:
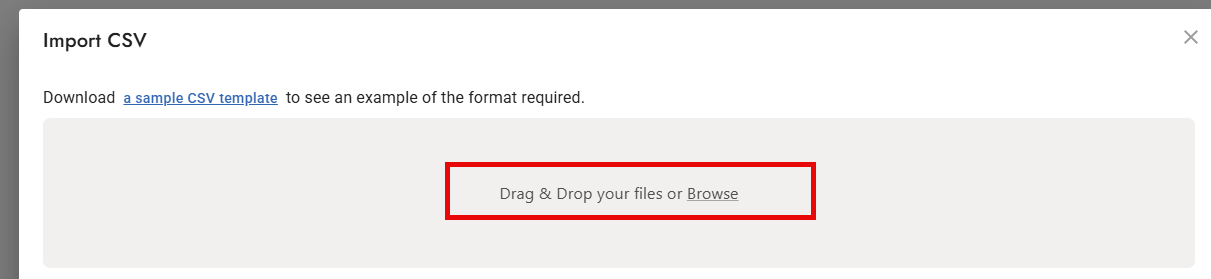
- Upload file or paste content
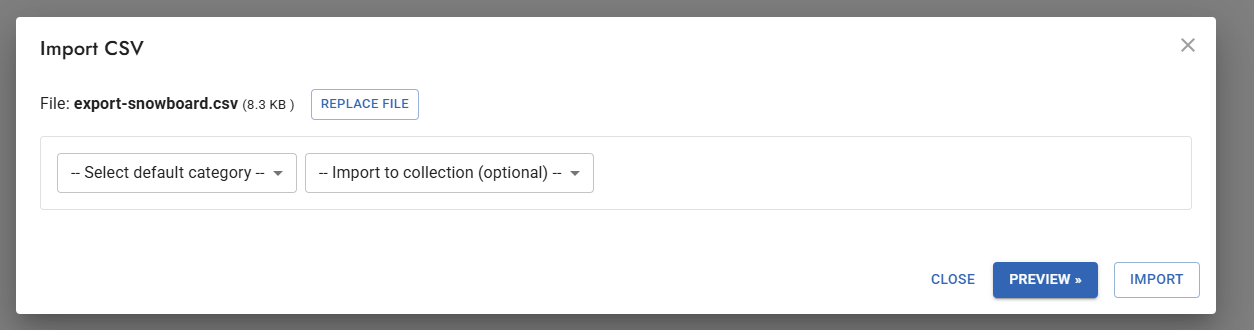
-
Select default category (optional)
-
Choose target collection (optional) - adds the imported products to it without touching their other collections (unlike a Collections column in the file, which replaces a product's collections)
3. Review Analysis and Configure Data types
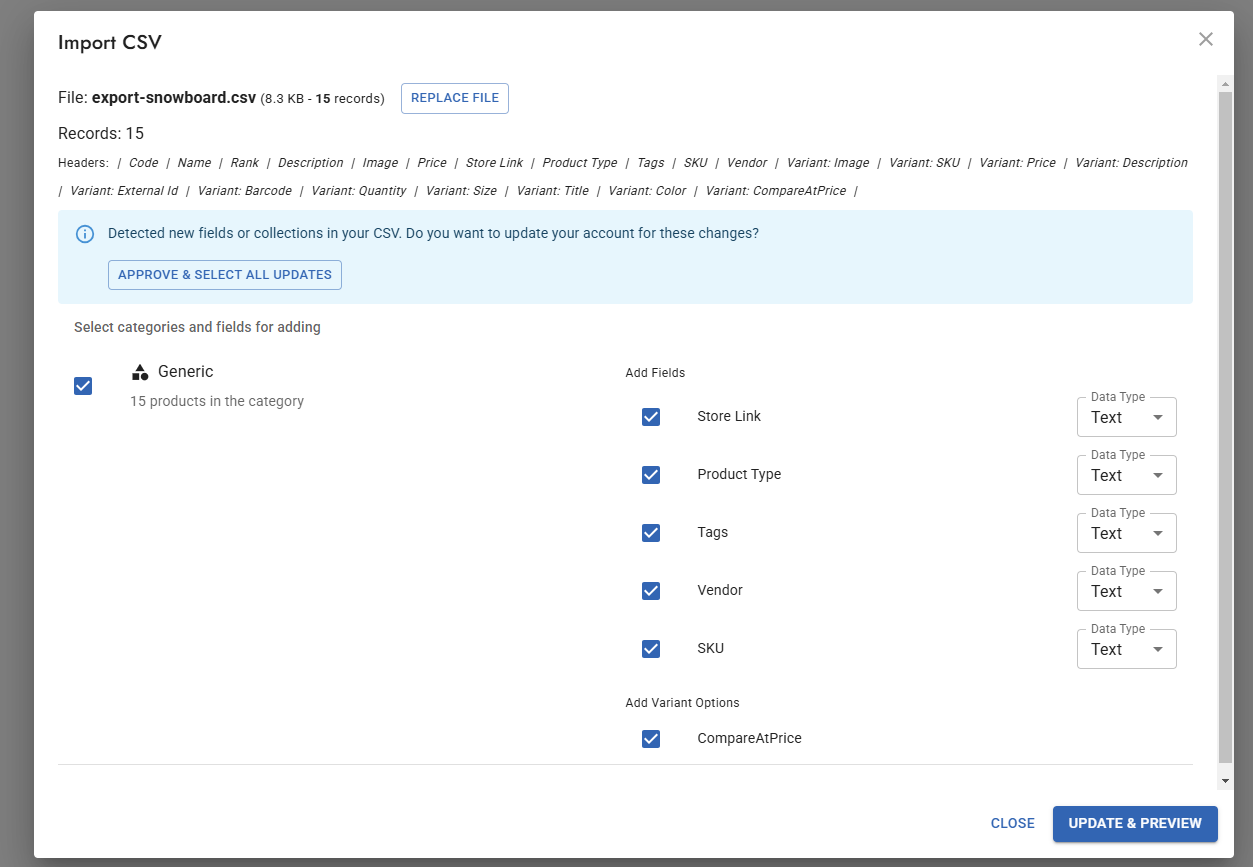
System checks for:
-
Data structure
-
New categories/fields
-
Missing required fields
-
Potential issues
You can:
-
Confirm new fields and categories
-
Set data types for new fields
-
Pick which column is the product code or the product name, when the file has no
CodeorNameheader -
Configure variant options
-
Untick a new collection you do not want. New collections found in the file are ticked for you; an unticked one is not created and the products are imported without it
Products with no category. When the file has no Category column (or some rows leave it empty), the analysis asks where those new products go. Choose one:
-
A category I already have - pick it from the list
-
A new category - type its name. It is created with the import, so a new account is not limited to the starter "Generic" category
-
A column of my file holds the category - pick the column, for a file whose category header is named something else (
Type,Categoria,Group). Each value in it becomes a category you can confirm. A row with an empty cell in that column is skipped
After you pick a category, or a code or name column, click Continue: the import reads the file again with your choices and lists the new categories and fields they lead to. A column you picked as the code or the name is not offered as a new field as well.
Then click Preview to see the result, or Update & Import to import without a preview.
4. Preview and Import
-
Review sample records. Each shows the category, code and name the product will get, the collections it will be in (new ones are marked "new"), then its fields and variants
-
Verify mappings
-
The preview changes nothing in your account. New categories, fields, variant options and collections are created only when you click Import
-
Something looks wrong? Click Back to return to your choices, change a data type or untick a field, and preview again. A field you unticked is not created
-
Click Import to start
-
Monitor progress
Technical Reference
CSV File Format Requirements
File Structure
-
UTF-8 encoded CSV file (supporting international symbols)
-
First row contains field headers
-
Each row represents a product or variant
-
Values separated by commas
-
Text containing commas should be enclosed in quotes
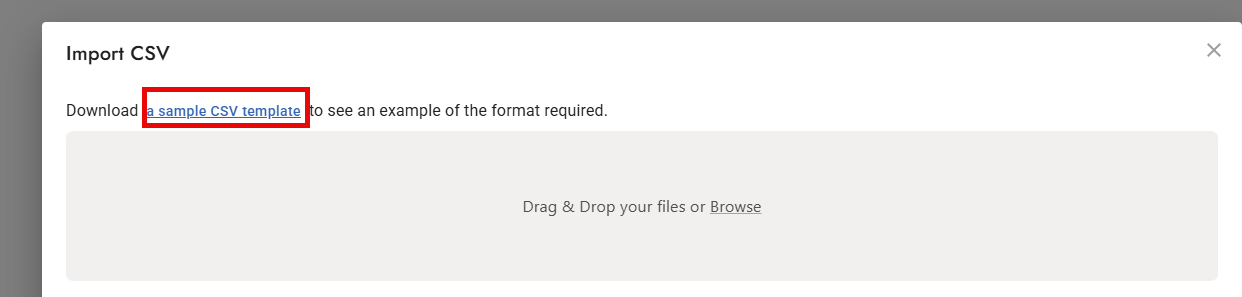
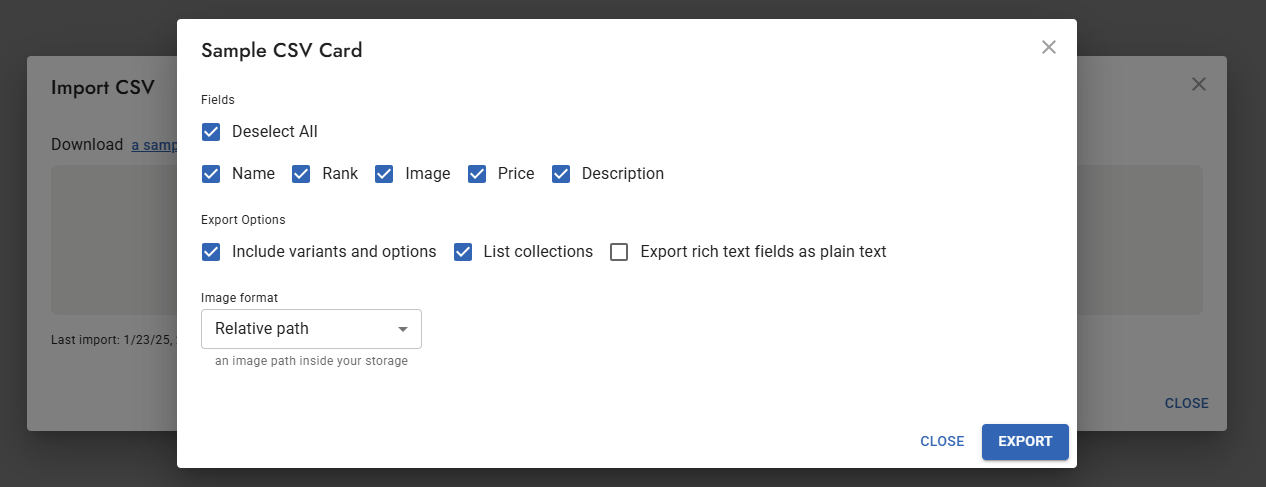
Tip: Export template with all fields as a starting point. Or use product export to get CSV file for existing products that you can re-import after editing in an external spreadsheet program. You can include variants and collections in this CSV.
Working with Spreadsheet Programs
Excel files
Upload the workbook directly: Import → CSV accepts .xlsx and .xls and reads it the same way as a CSV. What to know:
- One sheet is imported. Normally the first sheet that holds a table. If the workbook has other sheets with data, the import names the sheet it used and the ones it skipped. To import a different sheet, save that sheet as its own file.
- Title rows above the table are skipped. A heading, company line or note above the column headers is fine; the import finds the header row and tells you which row it used. If it picks the wrong row, delete the rows above your headers and upload again.
- Columns need a header to be imported. Cells to the right of the last header are ignored, and the import says how many.
- Formulas import as their last calculated value, the number you saw when you saved the file.
- Password-protected files cannot be read. Remove the password and upload again.
- Images placed inside cells are not imported. Use an image column with a file name or URL (see Working with Images).
Saving as CSV is still an option if a workbook will not open:

-
Click File → Save As
-
Choose "CSV UTF-8 (Comma delimited) (*.csv)", which keeps international characters
Google Sheets
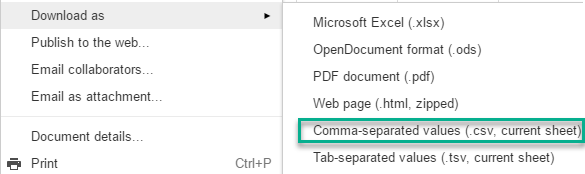
-
Edit your data
-
File → Download → Comma-separated values (.csv)
-
The file will automatically download in UTF-8 format
Header Row Fields
Note: First row contains field headers that correspond to your category fields:
-
If the column name matches an existing category field, it will be used
-
If the column name is new, you can add it as a new field during import
-
Common fields like Code, Name, Price, Description, Category work across all categories and reserved
Standard Fields
-
Code(optional): Unique product identifier -
Used to match existing products
-
Auto-generated if not provided
-
Example:
PROD-001 -
Name(required for new products): Product name -
Main product identifier
-
Example:
Blue Cotton T-Shirt -
Category(optional): Product category -
Must match existing category name or will create new
-
Example:
T-Shirts -
If not provided in the file, the import uses the default category you selected, or asks during analysis: an existing category, a new one you name, or another column of the file
-
Rank(optional): Display order -
Numeric value for sorting
-
Example:
100 -
Showcase(optional): Visibility for Showroom -
1 = visible, 0 = hidden
-
Example:
1
CollectionsNote: Collections specified in CSV will replace existing collections for the product
Collections can be specified in multiple ways:
- Single column format:
Collections "Best Sellers, New Arrivals/Dresses"
- Multiple columns format:
Collections 1, Collections 2 "Best Sellers", "New Arrivals/Dresses"
Formatting rules:
-
Separate multiple collections with commas
-
Use forward slash (/) for hierarchy
-
Example hierarchies:
-
Cars/Ford/Mustang -
Best Sellers/Sport
Order of collections and products after import
- By default collections are sorted A to Z, at every level
- To keep the order of your file, pick Collection order: As in the file on the first import screen (next to the default category). Collections are then numbered in the order your rows first name them (for example Reagents, then Consumables, then Equipment), and the collections inside each in the same way. The products inside each collection follow the order of your rows too
- It also works on a re-import: import the same file again with As in the file and your existing collections, and the products inside them, are put in the file's order. Products are updated by their
Code, nothing is duplicated - Collections that are not in the file keep their order and come after the ones that are. The same goes for products in a collection that the file does not list
- Leave it on A to Z for a store's export (Shopify, WooCommerce): those files list collections in no particular order
- You can still set the order by hand: open Products, select a collection, click Edit and give it a Rank (1, 2, 3...). Lower numbers come first
- To order products inside a collection, add a
Rankcolumn to the file with numbers. Lower numbers come first - For sections in a set order, use nested collections with a Rank. You do not need to set parent categories for that
Working with Images
Image Import Methods
- Local Images
-
Go to Image Manager first
-
Create or select a folder
-
Upload your images
-
Use relative paths in CSV. Format:
{Folder}/{image-name.ext}
Example: Products/blue-shirt.jpg
- Web URLs
-
Direct links to public images
-
Format:
https://example.com/image.jpg -
Supported formats: JPG, PNG, GIF, WEBP
-
Maximum size: 10MB per image
- File Sharing Services
For Google Drive, Dropbox, and other cloud storage URL conversion, see the Image Management article under "Upload from URL".
Image Field Configuration
Note: Image field names in CSV must exactly match the category's image field names, unless you want to add new image fields to the category
In your CSV, image fields can contain:
- Relative Path (for uploaded images):
cover.png MyFolder/123.png Products/product-image.jpg
- Absolute URL (for web images):
https://example.com/images/product.jpg https://drive.google.com/uc?export=download&id=FILEID
- Data URL (base64 encoded) - encoded image content in the string
data:image/jpeg;base64,/9j/4AAQSkZ...
You can use Catalog Machine export or tools like https://dopiaza.org/tools/datauri to generate Data url
Recovery: the import succeeded but 0 images loaded
This is the most common image failure, and it is fully recoverable without redoing the import. The symptom is a job that reports something like "138 products, 0 errors" alongside "0 / 134 images".
Almost always the cause is that the image column holds bare file names copied from a supplier spreadsheet (BD652701_v1_1.jpg, KA360180_1.jpg) rather than a path or a URL. Nothing is wrong with the file — those names simply point at files that only exist on the customer's own computer, so there was nothing for the importer to download.
The fix is to give those names something to resolve against:
- Go to Images and upload the actual image files (drag the whole folder in - multi-select works).
- Put them where the CSV says they are. If the column reads
BD652701_v1_1.jpg, upload to the root of the image library. If it readsProducts/BD652701_v1_1.jpg, upload into aProductsfolder. - Re-import the same CSV, unchanged. The importer matches each name against the library and links the existing file.
Two things that make this fail, both worth stating up front:
- Names are case sensitive.
IMG_001.JPGwill not matchimg_001.jpg. - The extension is part of the name. A column that says
BD652701_v1_1with no.jpgwill not match.
Re-importing is safe here: matching on Code updates the existing products rather than duplicating them, and a filled image column overwrites only the image field. (An empty cell keeps the value the product already has, and so does an absent column. To clear fields with empty cells instead, untick "Keep the existing value where my file has an empty cell" on the import screen; names and product images are never cleared this way. If the customer only wants to fix images, a two-column CSV of Code + the image field is the cleanest re-import.)
Do not send the customer to source these images from the web instead. They already have the files - that is where the supplier file names came from. Uploading them is minutes; re-sourcing 138 images is hours and gives a worse result.
An image path that cannot be resolved never wipes the image already on the product. The row imports, the product keeps the picture it had, and the import warns you which paths did not resolve. So a failed image column costs you the update, not your existing images.
Moving products between two Catalog Machine accounts
Exporting from one account and importing into another is not a supported copy, and the trap is images. A relative path such as Products/blue-shirt.jpg means "in this account's image library", so in the receiving account it points at nothing.
If you are moving products between your own accounts, export with the Absolute URL image format instead of the default Relative path. The receiving import then downloads each image properly. With relative paths the products arrive without their pictures, and the import tells you so rather than reporting a clean success.
Within a single account, keep the default Relative path — it is faster, because the importer links the file you already have rather than downloading it again.
Multiple images per product:
-
Create multiple image fields in category
-
Name them differently (e.g., Image1, Image2)
-
Reference in CSV by field name
Special Content Types
Rich Text Fields
-
Support basic HTML formatting (useful for product descriptions, specifications, etc.)
-
CSS is not supported
-
Example format:
<div>Product description with <b>bold</b> and <i>italic</i> text</div>
Variant Fields

-
Use same product
Codeto link variants to the parent product (variants appear as options of the main product) -
Include variant-specific fields in same row, prefixed
Variant:(with a space after the colon -Variant:Sizeis read as a plain product field, not a variant) -
Use consistent naming convention
-
Example structure:
Code,Name,Variant: Size,Variant: Color,Variant: Price SHIRT-1,"Blue Shirt","M","Blue",28.99 SHIRT-1,"Blue Shirt","L","Red",29.99
Tips for Successful Import
Preparing Your File
-
Start with a template
-
Export existing products as template
-
Use sample CSV provided
-
Match field names exactly
-
Verify encoding
-
Save as UTF-8 CSV
-
Check for special character issues
-
Test with small sample first
Common Issues and Solutions
-
Encoding Problems
-
Symptoms: Garbled text, missing characters
-
Solution: Save as UTF-8 CSV
-
Alternative: Copy/paste directly into import
-
Image Import Failures
-
Check URL and image public accessibility
-
Verify file size limits
-
Confirm image format support
-
Missing Data
-
Required fields not populated
-
Category mismatches
-
Invalid collection paths
CSV Export
Export your product data and images to CSV for use in Excel, Google Sheets, or re-importing later.
Steps
- Go to → Products
- Select products for export (use category, collection, or search filters to narrow down)
- Click Export in the bulk actions toolbar
- Select fields to include in the export
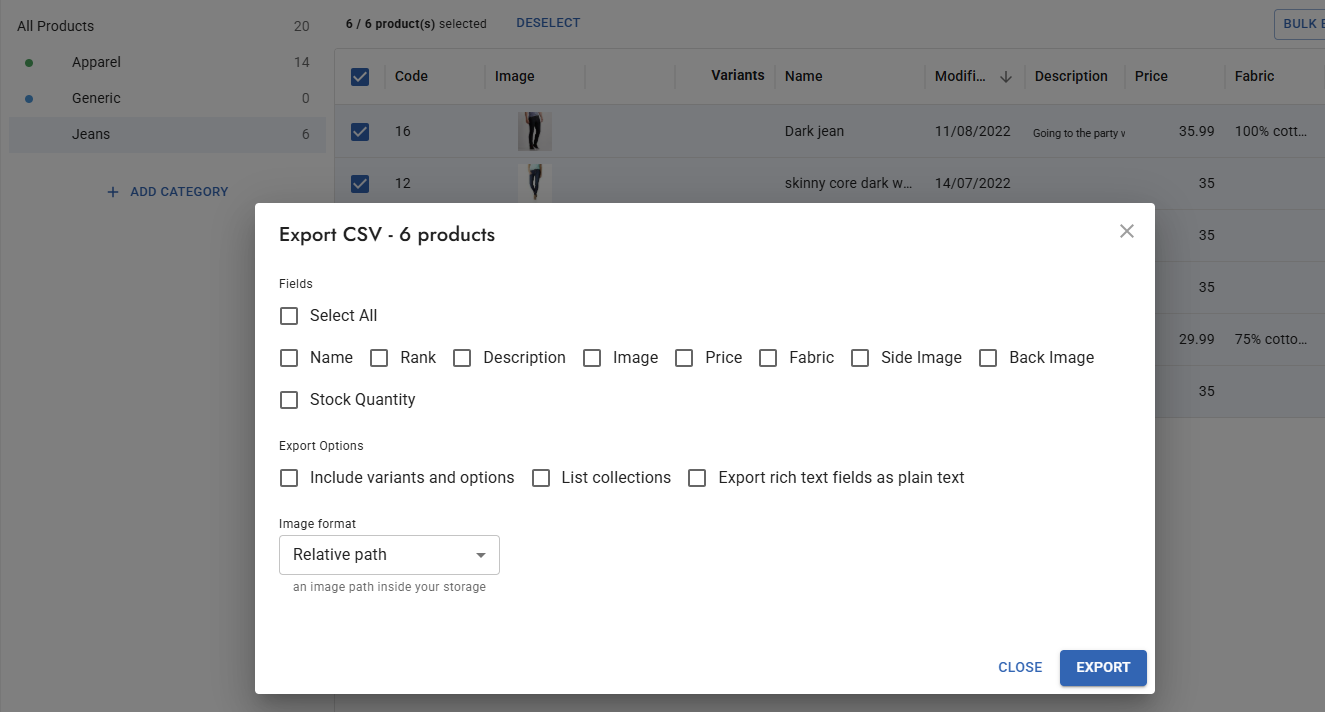
- Choose Image format (see options below)
- Select additional export options as needed
- Click Export — the CSV file downloads to your computer
Tip: Export and re-import is a great way to bulk-edit products in Excel or Google Sheets. Read more about this workflow in the Common Scenarios section above.
Image Format Options
Choose how image fields are included in the export:
- Relative path (default) — image path inside your storage (e.g.,
Products/blue-shirt.jpg). Best for re-importing back into Catalog Machine. - Absolute URL — full web address of the image (e.g.,
https://images.catalogmachine.com/.../photo.jpg). Best for viewing images in Google Sheets or sharing with others. - Data URL (embedded) — base64-encoded image content embedded directly in the CSV (
data:image/png;base64,/9j/4AAQSkZ...). Makes the file self-contained but increases file size significantly.
Displaying Exported Images in Spreadsheets
Google Sheets:
- Export products with Absolute URL image format
- Open CSV in Google Sheets
- Use the
=IMAGE()function to display images from URL columns. See: https://support.google.com/docs/answer/3093333 - Optionally hide the original Image URL column
Microsoft Excel: Excel requires VBA macros to display images from URLs. See: https://www.extendoffice.com/documents/excel/4212-excel-insert-image-from-url.html
Other Export Options
- Include variants and options — exports variant rows with the parent product
- List collections — adds a Collection column
- Export rich text as plain text — strips HTML formatting from rich text fields
Need Help?
Alternative: AI Concierge Don't want to format a CSV? The AI Concierge can import products from:
- Plain text descriptions
- Pasted spreadsheet data (any format)
- Product images or photos
- PDF documents with product lists
→ Try AI Import
Support Contact our support team through chat for assistance with:
-
File preparation
-
Image importing
-
Error resolution
-
Custom requirements
For immediate answers about specific formats or issues, refer to the relevant sections above