
Learn how to create, import, and manage your product information for professional catalogs.
Quick Start Guide
Ways to Add Products
-
Shopify Store?
- Connect to import products automatically
- All products, images, and variants transfer directly
-
Have a Spreadsheet?
- Import via CSV/Excel
- Efficient for bulk product creation
-
Starting Fresh?
- Start with the "Generic" category - it's ready with basic fields (name, price, description)
- Add products directly in the grid view
Next Steps
- Organize products (categories and collections)
- Create your first catalog with products
Understanding Products and Categories
Each product in Catalog Machine has information like name, price, and images. Products always belong to a category that determines what information you can store.
- The "Generic" category (available by default) has basic fields like name, price, image, and description
- Create custom categories only when you need:
- Different product fields
- Different variant options
- Different pricing structures
- Different image sets
These fields will appear in catalogs and product cards as placeholders:
- Text fields:
{{Name}},{{Description}} - Price fields:
{{Price}},{{SalePrice}} - Images:
{{Image}},{{DetailImage}}
Categories vs Collections - Key Differences
| Feature | Categories | Collections |
|---|---|---|
| Purpose | Define product structure | Organize products |
| Membership | ONE category per product | MULTIPLE collections per product |
| Controls | Available fields and options | Grouping and navigation |
| Example | "T-Shirts" with fabric, sizes | "Summer Sale", "New Arrivals" |
✅ You CAN change a product's category! Use Bulk Edit in the Product Grid, or click the category chip when editing a single product.
⚠️ Before moving products: Compare ALL field names in both categories. Fields with exact name matches in the destination category carry over automatically. Fields without matches (including SKU, custom fields, etc.) are permanently lost. Check your destination category's field list first to avoid data loss.
1. Configure Categories
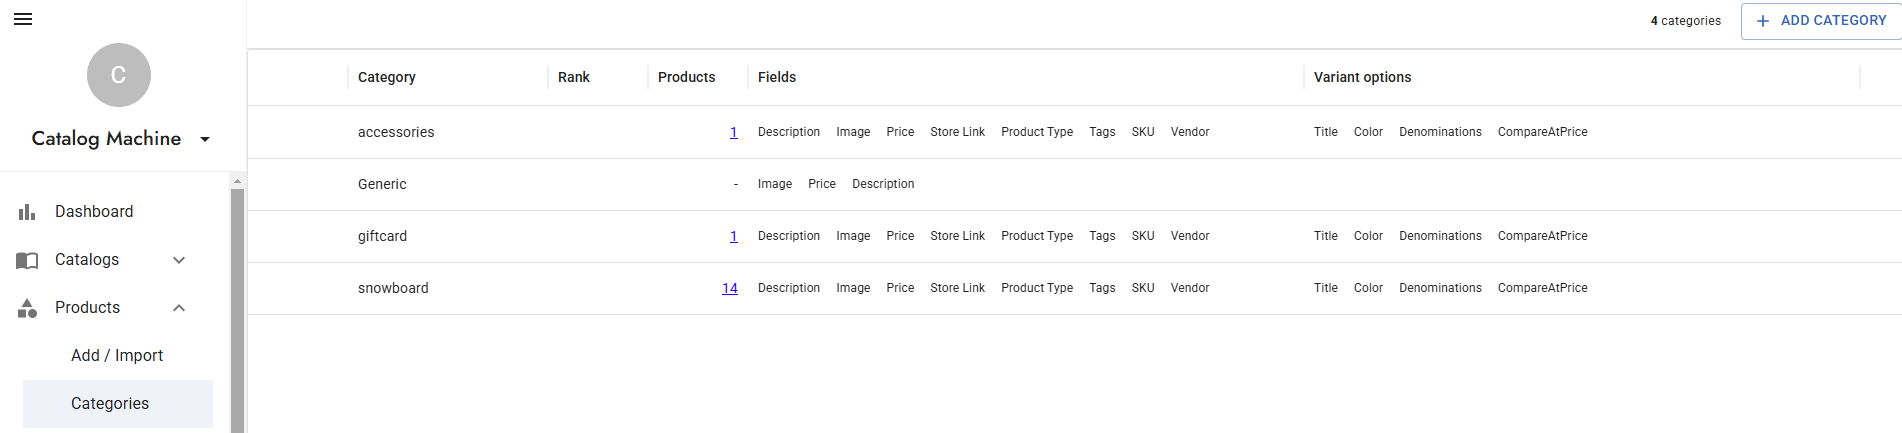
- Navigate to Products → Categories
- Click Create new category
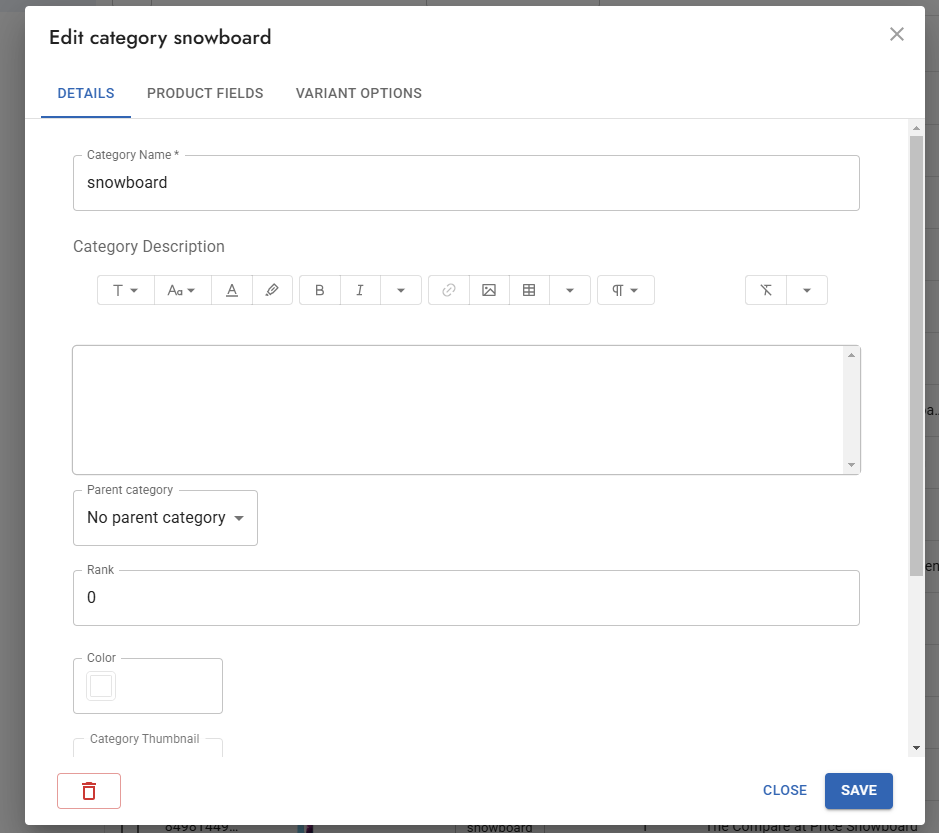
- Enter basic information:
- Name
- Description (optional)
- Parent category (optional)
- Color (for visual organization)
- Thumbnail image (optional)
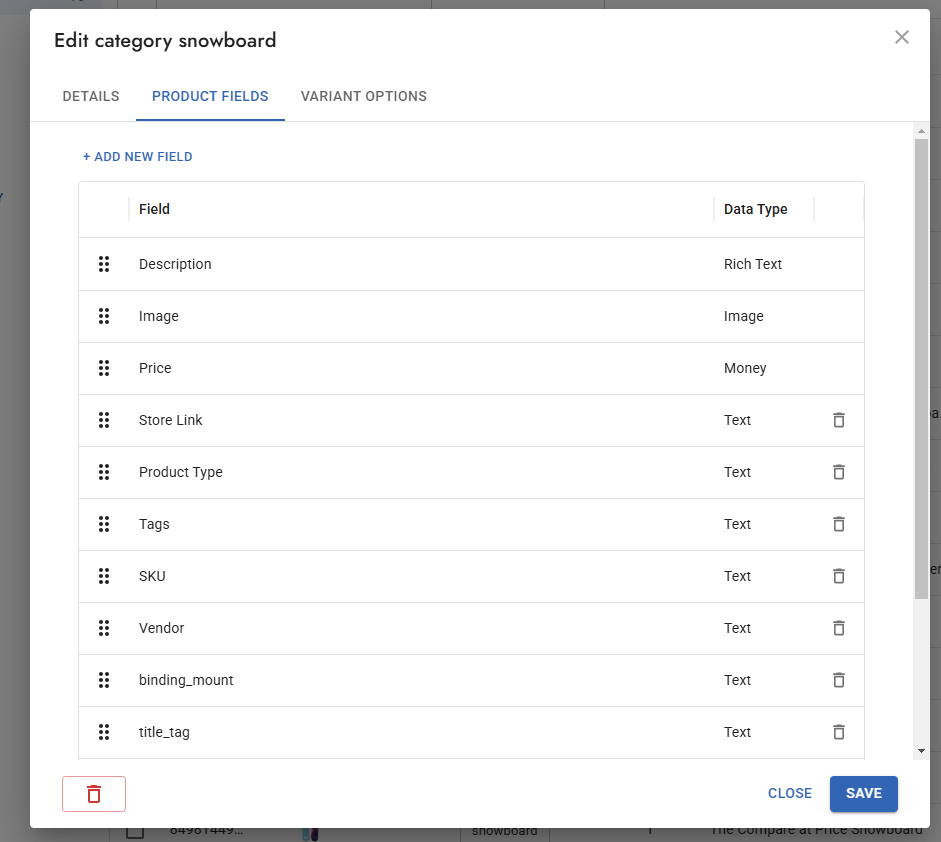
Setting Up Category Fields
Available field types:
| Type | Use For | Examples |
|---|---|---|
| Text | Basic information | Names, SKUs, short text |
| Rich Text | Formatted descriptions | HTML styling, bullet points |
| Number | Measurements | Weights, quantities, dimensions |
| Money | Prices with currency | 1000, $1,000.99, USD 1000 |
| Date | Temporal information | Launch dates, availability |
| Image | Product photos | Main images, detail shots |
Tip: Add multiple fields of the same type for different purposes:
Category: "T-Shirts"
Fields:
  - Regular Price (Money)
  - Sale Price (Money)
  - Wholesale Price (Money)
  - Main Image (Image)
  - Detail Image (Image)
  - QR Code (Image) - for print catalogs linking to online pages
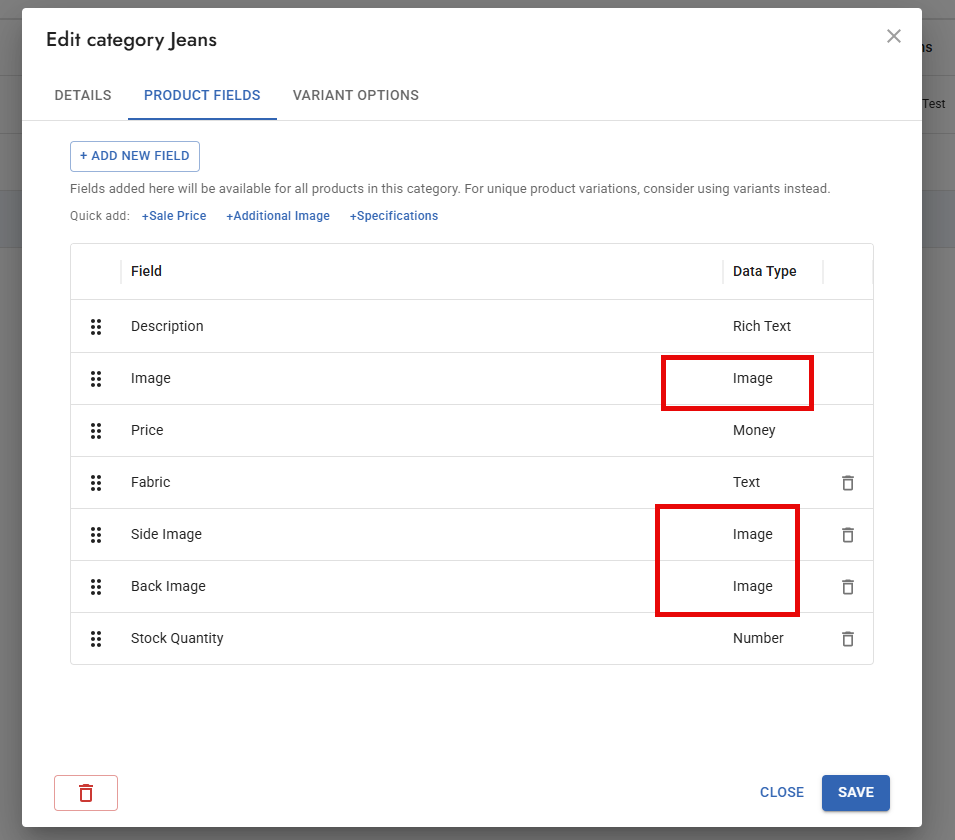
Note: Image fields can store any image - product photos, logos, QR codes, icons. Use descriptive names so they're easy to reference in Product Cards (e.g., {{QR Code}}).
Hiding a Field vs Deleting It
To "remove" a field such as prices, cost, SKU or stock, you almost always want to stop showing it, not destroy the data. Hide it first; delete it only if the values themselves should be gone. Decide where it should disappear (catalog, showroom, order form), because each is a separate place.
Hide a field (the data stays):
- A field appears in catalogs and the showroom only where its placeholder is used, e.g.
{{Price}}or{{SKU}}. Remove that placeholder from the Product Card in Design → Cards (or from the text element on a catalog page). Every catalog and showroom page using that card updates. - Several cards can be in use (Catalog Product Grid, Showroom Product Details, Showroom Product List), so check each card your catalogs and showroom use.
- To hide one field only in a single catalog, duplicate the card, remove the placeholder from the copy, and use the copy in that catalog.
- Prices on the order form and order emails have their own switch: Orders → Settings → Display Price and Total.
Delete a field (the data is gone): Products → Categories → open the category → delete the field. This removes the field and its values from every product in that category, with no undo. Export your products to CSV first if you might want the values back. Each category has its own fields, so a field shared by several categories has to be deleted in each one.
Setting Up Variant Options
Define variant options at the category level:
Category: T-Shirts
Options:
  - Size (S, M, L, XL)
  - Color (Red, Blue, Black)
2. Product Grid
The Product Grid is your main workspace for managing products efficiently.
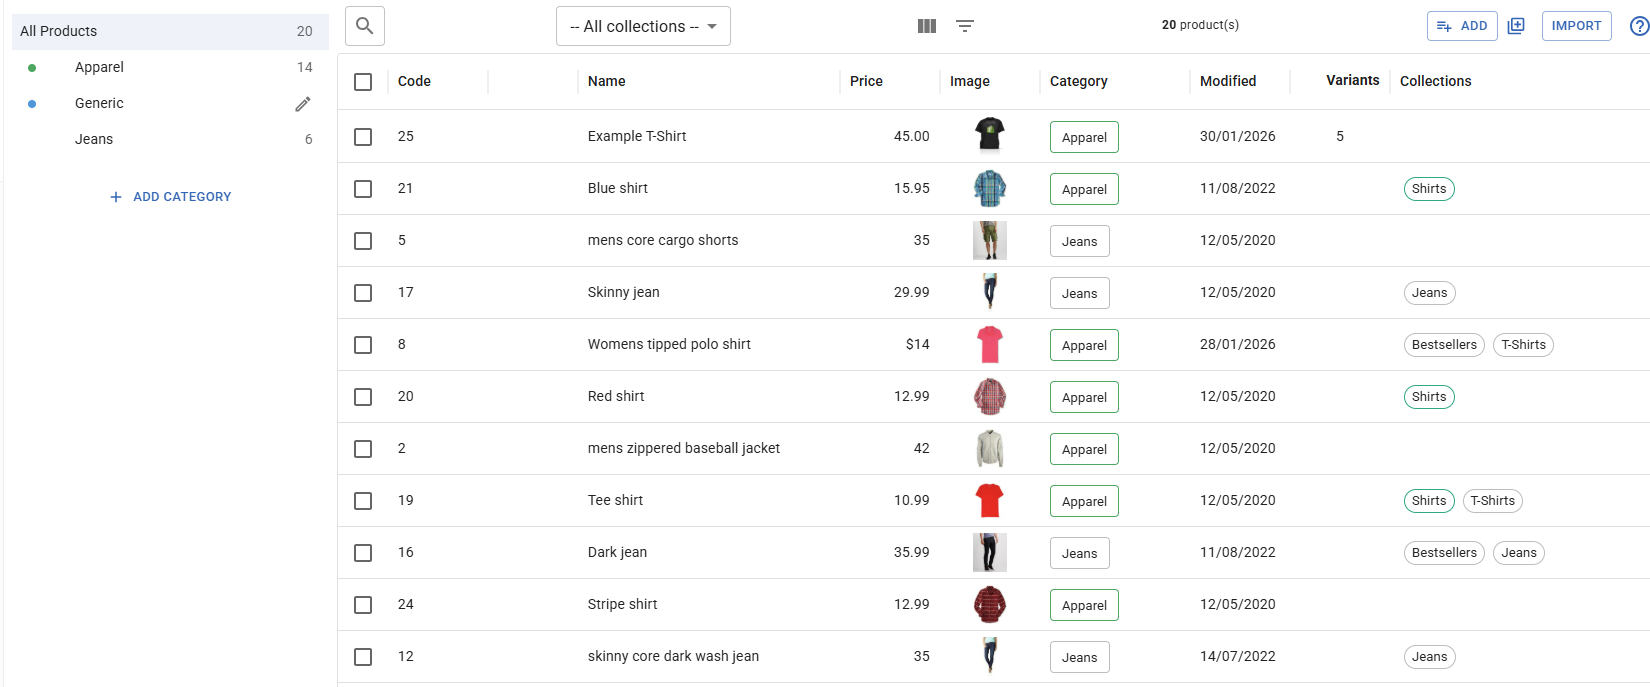
Grid Layout
- Left sidebar: Category navigation with product counts
- Main area: Spreadsheet-style product grid
- Toolbar: Search, filters, and actions
Viewing Products
- All Products: Shows every product across all categories
- By Category: Click a category in the sidebar to filter
- Search: Use the search box to find products by name or code
- Collection Filter: Filter by collection using the dropdown
Inline Editing
Double-click any cell to edit directly in the grid:
- Text fields: Type directly
- Money fields: Enter values like
$19.99or19.99 - Press Enter to save, Escape to cancel
Grey cells with "—" indicate fields that don't exist for that product's category.
Column Customization (All Products View)
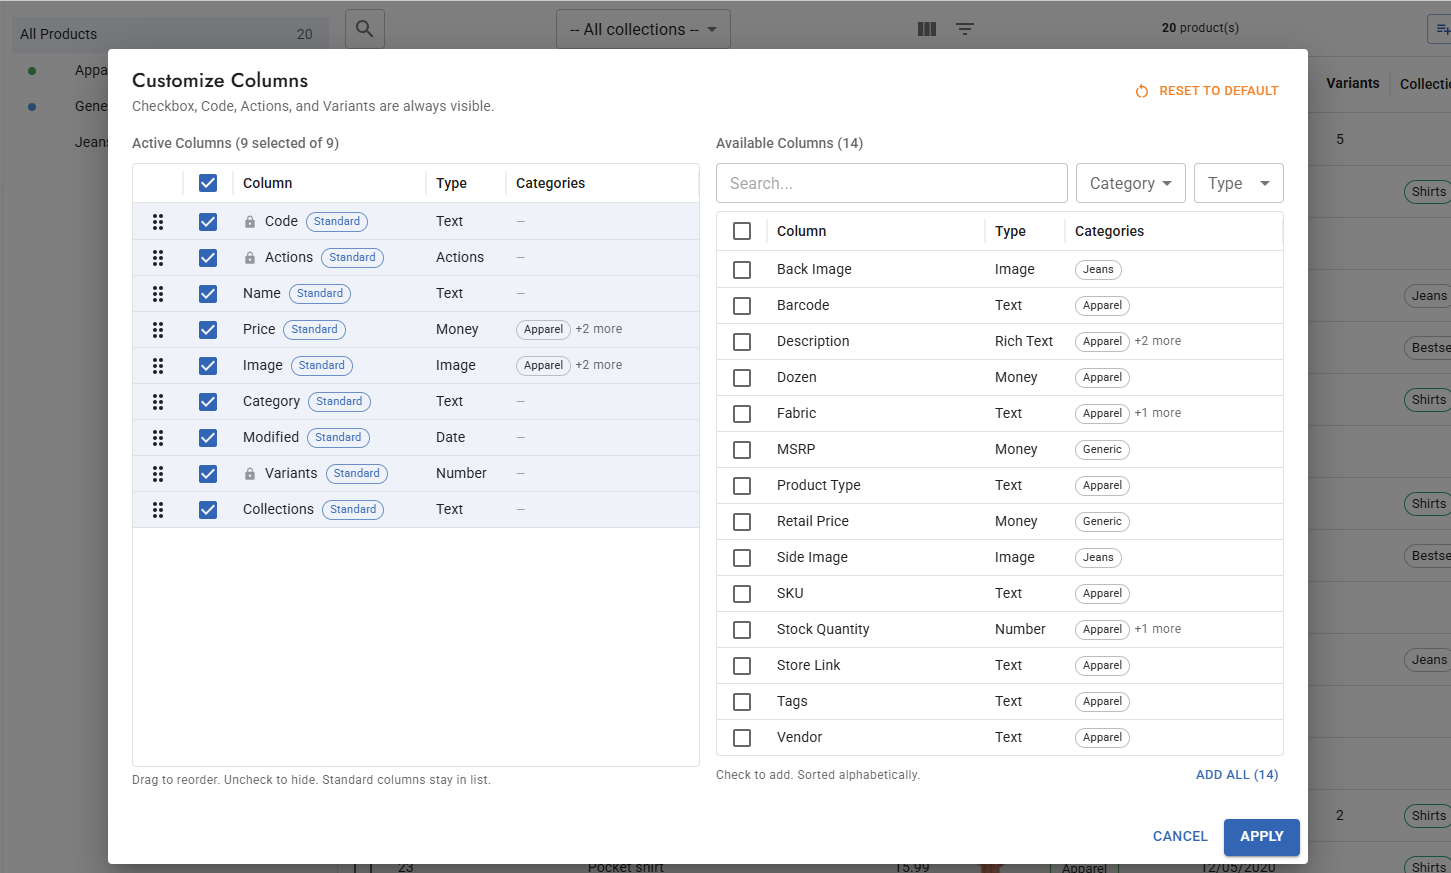
Click the Columns button (grid icon) to customize visible columns:
- Search: Find columns by name
- Filter by Category: Show fields from specific categories
- Filter by Type: Show only Text, Money, Image, etc.
- Drag to reorder: Arrange columns in your preferred order
- Locked columns: Code, Actions, and Variants always stay visible
- Reset to Default: Restore standard column layout
Your column preferences are saved automatically.
Filtering Products
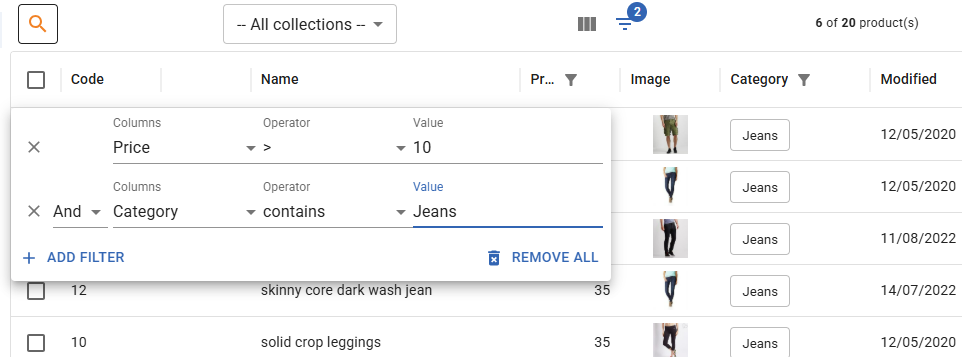
Click the Filter button to open advanced filtering:
- Multiple filters: Combine conditions (AND logic)
- Filter operators:
- Text: contains, equals, starts with, ends with, is empty
- Money: equals, greater than, less than, between
- Date: is, before, after
- Filter badge: Shows count of active filters
- Persistent filters: Your filters are saved between sessions
The toolbar shows "X of Y products" when filters are active.
Sorting
Click any column header to sort:
- Click once: Sort ascending (A→Z, low→high)
- Click again: Sort descending (Z→A, high→low)
- Click third time: Clear sort
Money fields sort numerically (not alphabetically), so $100 comes after $20.
Expanding Variants
Click the expand arrow on any product row to see its variants inline:
- View all variant combinations
- Edit variant prices, SKUs, and options directly
- Add or remove variants
3. Adding Products
Quick Add (Inline)

- Click Add button in toolbar
- A new row appears in the grid
- Fill in the fields directly
- Changes save automatically
Add with Form (Modal)
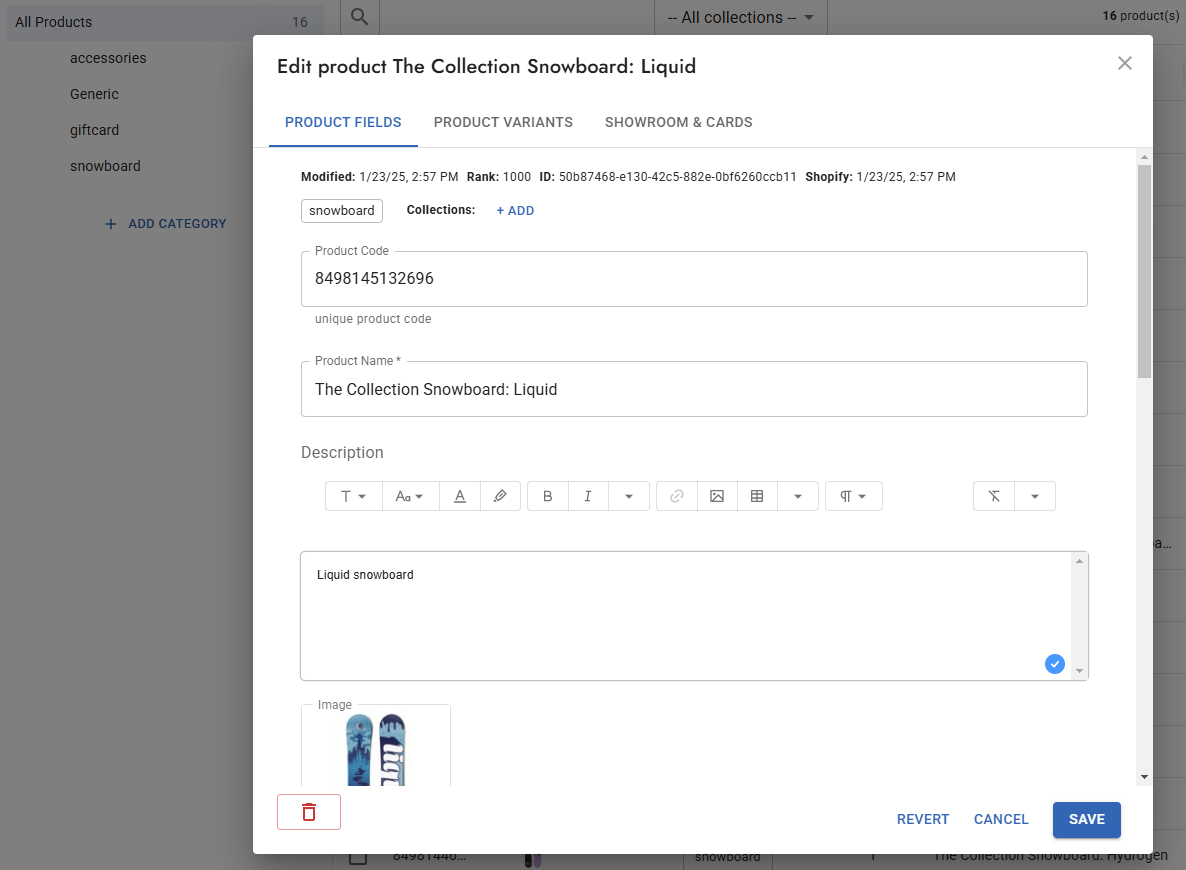
- Click the + popup icon next to Add
- Fill in the product form
- Add multiple images
- Configure variants
- Click Save
Import Options
Click Import to see options:
- AI Import: Guided import with AI assistance (recommended for new users)
- Product Upload: Upload product images and data
- CSV/Excel: Bulk import from spreadsheet
- Shopify: Connect and sync your Shopify store
4. Bulk Operations
Select multiple products using checkboxes to enable bulk actions:

Selecting Products
- Click checkbox: Select individual products
- Select All: Select all visible products (respects filters)
- Deselect: Clear selection
Bulk Actions
| Action | Description |
|---|---|
| Bulk Edit | Update a field value for all selected products |
| Duplicate | Create copies of selected products |
| Export | Download selected products as CSV |
| Delete | Remove selected products (with confirmation) |
Bulk Edit Dialog
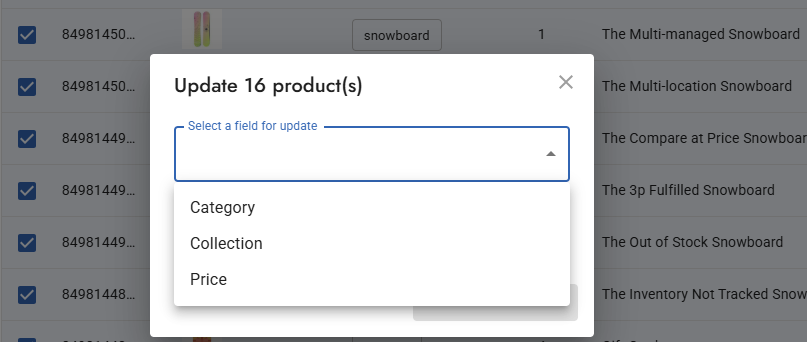
- Select products → Click Bulk Edit
- Choose field to update (Category, Collection, Price, etc.)
- Enter new value
- Click Update
For Collections:
- Add: Add products to a collection
- Remove: Remove products from a collection
Duplicate Products
- Single product: Open product edit modal → Duplicate button
- Bulk duplicate: Select products → Click Duplicate
- Creates independent copies with new names ("Product v1", "Product v2")
- Clears sync fields (Shopify ID, etc.) for fresh copies
5. Managing Variants
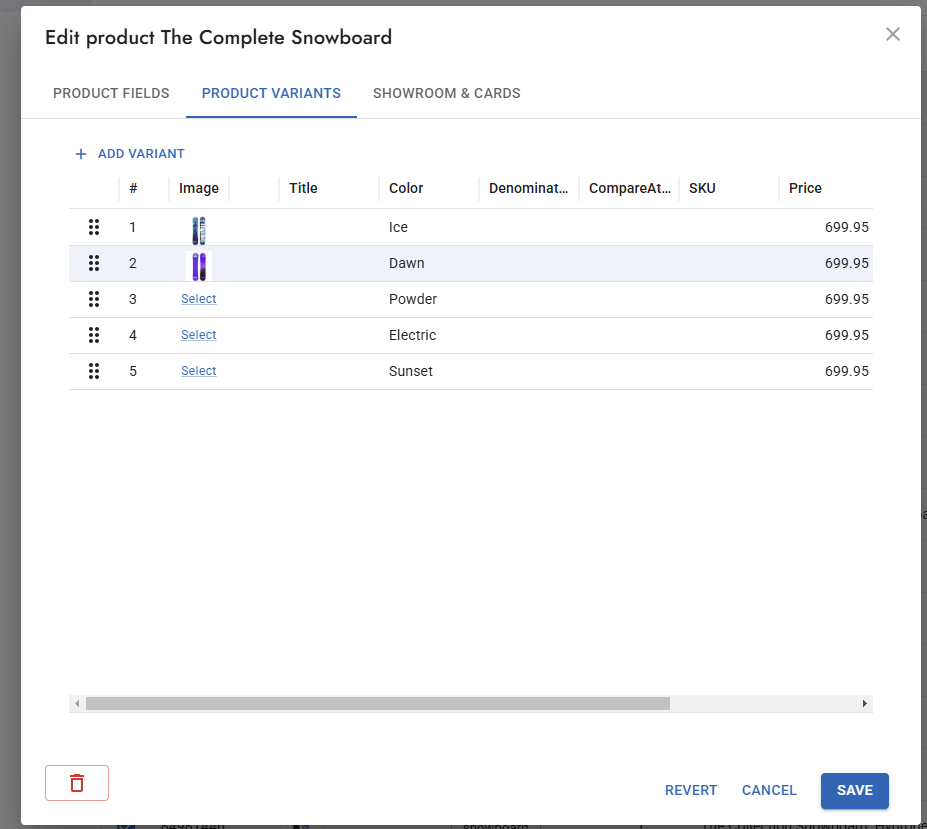
Variants let you manage different versions of the same product with different options, prices, and images.
Creating Variants
- First, set up variant options in the category (e.g., Size, Color)
- Open product edit modal
- Go to Variants section
- Click Add variant
- Select option values and set price/SKU
Variant Grid
Each product with variants shows an expandable row:
- Click expand arrow to see variant grid
- Edit variant fields inline
- Reorder variants by dragging
- Delete variants with the trash icon
Variant Fields
Each variant can have:
- SKU: Unique identifier
- Price: Variant-specific price
- Quantity: Stock level
- Image: Variant-specific image
- Description: Variant notes
- Barcode: For inventory tracking
Product Bundles
A bundle is a single product that's sold as one line but ships as a combination of other products (a "kit", "set", or "pack"). The customer orders "Summer Pack" once; behind the scenes it's made up of the component products you choose.
When to use a bundle
- Kits and sets: "Starter Kit", "Gift Box", "Camera + Lens + Bag"
- A discounted package priced below the sum of its parts
- Anything you want to sell as one item but fulfill as several
If you just need different sizes/colors of the same product, use Variants instead, not a bundle.
Creating a bundle
- Open a product (or create one) and go to the Bundle tab in the product edit window.
- Turn on "This product is a bundle".
- Click Add component, pick a product, set a per-component quantity, and choose how its size/variant is handled:
- Customer picks at order — for a component that has variants, the buyer chooses the size at checkout (the default for products with variants).
- A specific variant (e.g. "Size M") — locks every order of the bundle to that exact variant.
- A product without variants is simply included as the whole product.
- Add as many components as the bundle needs.
- Set the bundle's own price on the Product Fields tab (the Price/Dozen/etc. field) — that's the single price the customer pays. The bundle uses your catalog's price field just like any product.
- Save.
The bundle appears in catalogs and the Showroom as a normal product card (its own image, title, price). A small bundle icon marks it in the product list.
How bundles behave
- Customer view: sees one line — "1 × Summer Pack" — at the bundle price. If a component is set to Customer picks at order, the buyer selects its size on the order form (only in-stock sizes are offered, and they can't submit until every size is chosen). The chosen sizes appear on the order and in the order emails. Components that don't need a choice stay behind the single bundle line. If a customer orders more than one of the same kit, the sizes they pick apply to each one.
- Admin order detail & seller order emails: show the bundle plus its components — with the chosen sizes — indented underneath, so you know exactly what to pack and ship.
- Order total: the bundle's price only (components don't add to the total). This also holds for exported orders (e.g. the API / Zapier), where components are listed at 0 so the total stays the bundle price.
- Stock: a bundle is available when every component has stock — for a component with sizes, at least one size must be in stock; for a component without sizes, its Stock Quantity must be above 0 (an untracked component is treated as out of stock and blocks the bundle). The customer can only pick in-stock sizes. The Bundle tab shows "Bundle stock" and "Max from components" to help.
Rules and limits
- Bundles and variants are mutually exclusive — a bundle can't also have its own variants (its components may be variants of other products).
- No nested bundles — a bundle's component can't itself be a bundle.
- Edit bundles in the new admin only — the V1 (classic) admin shows a banner and blocks editing bundle products to protect the composition.
- AI Concierge can't create or edit bundles yet — build them on the Bundle tab. Concierge will leave existing bundles untouched.
6. Organizing Collections
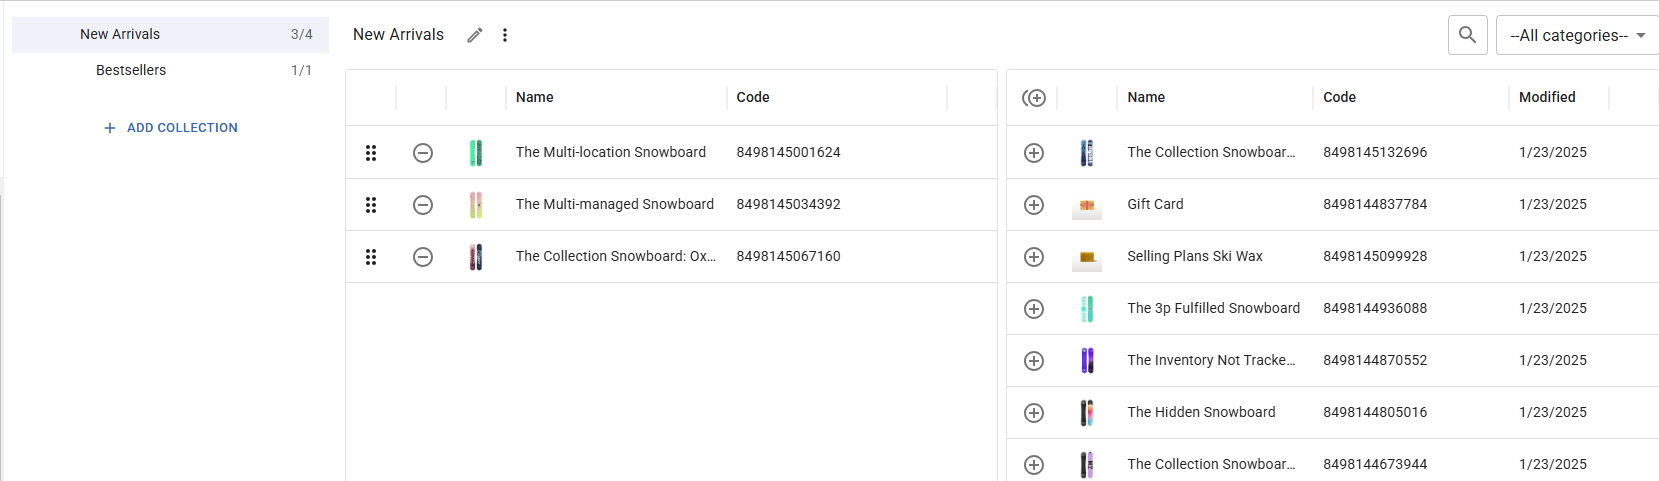
Collections help you group products flexibly for catalogs and Showroom.
Creating Collections
- Go to Products → Collections
- Click New Collection
- Enter name and optional description
- Add products by searching or browsing
Collection Features
- Drag to reorder: Arrange products in your preferred order
- Sub-collections: Create hierarchical organization
- Order by field: Sort products by any field (Name, Price, etc.)
- Reverse order: Flip the current order
- Filter products: Search and filter within the collection
Where a New Product Lands in the Order
Each collection keeps its own product order, independent of every other collection and of the product's Rank field.
- Added from the product grid or the collection editor: the product is appended to the bottom of the collection. Your existing order is untouched.
- Added by a Shopify import: if you filtered by a Shopify Collection before importing, products arrive in that collection's own order. Otherwise they are appended in the order they were loaded. See "Shopify Import and Collection Order" in the Shopify Integration Guide.
- Re-importing or re-syncing does not reorder a collection you arranged by hand. Existing products keep their positions, and anything new is appended after them.
Removing Products from Collections in Bulk
Select products in the grid → Bulk Edit → choose Collection → pick the collection → Remove.
This removes the selected products from one collection per operation. There is no "remove from all collections" action, so clearing products out of many collections means repeating the step once per collection. Your selection stays active between operations.
If your goal is to hide out-of-stock products rather than to reorganize them, do not remove them from collections at all. Use the In Stock products only option on the showroom or on the catalog product list instead. It filters the display without changing membership or order, and it updates itself as stock changes.
If your goal is to hide one specific product rather than everything out of stock, use Display in Showroom instead. See "Hiding Products Without Deleting Them" below.
Using Collections
Collections appear in:
- Catalog Designer: Use collections as product sources for AutoGrid
- Showroom: Collections become navigation categories
- Product Grid: Filter to show only collection products
Hiding Products Without Deleting Them
You never have to delete a product to take it off your showroom. Two separate levers do it, and they answer different questions.
Display in Showroom (hide one specific product)
Open the product -> Showroom & Cards tab -> turn off Display in Showroom. The product keeps every field, image, variant and collection position, and switching it back on returns it to exactly the same place.
You can also toggle it straight from Showroom -> Products: the green check in the Status column removes the product from the showroom, the plus icon adds it back.
For many products at once, use CSV. The Showcase column takes 1 (visible) or 0 (hidden); export, set the column, and import back.
Scope: this setting only affects showrooms. Catalog pages, AutoGrid, product-list pages and the generated PDF ignore it, so a hidden product still prints in a catalog. To keep it out of a catalog too, use In Stock products only on that page, or leave it out of the collection the page uses.
In Stock products only (hide whatever is out of stock, automatically)
Use this when the rule is "hide it while it is out of stock" rather than "hide this one product". Turn on In Stock products only in Showroom -> Properties, or on a catalog product list page. Out-of-stock products stay in their collections and keep their order, and they come back on their own when stock returns.
This does not require a Shopify feed or any integration. Open Inventory in the left menu and set quantities by hand - Bulk Edit Quantity does a whole selection at once, and the page adds the Stock Quantity field to any category that does not have one yet. A product with quantity 0, and no variant with stock, counts as out of stock.
Common Questions
Q: How do I change a product's category? A: Yes, you can change categories! Two ways:
- Bulk: Select products → Click Bulk Edit → Choose "Category" from dropdown → Select new category → Update
- Single product: Open product → Click the category chip → Select new category
Note: Fields specific to the old category will be cleared, but core fields (Name, Images, etc.) transfer over.
Q: Why can't I edit a field in the grid? A: Grey cells with "—" indicate the field doesn't exist for that product's category. Edit the category to add the field, or change the product's category.
Q: How do I find products without images? A: Use the Filter button, select the Image field, and use "is empty" operator.
Q: Can I undo a bulk edit? A: There's no undo for bulk operations. For important changes, export your products first as a backup.
Q: How do I copy products to a new collection? A: Select products → Bulk Edit → Collection → Choose collection → Add.