
Design custom price lists, order forms, product indexes, and more. Product lists give customers a structured way to view product details, pricing, and other information in a table format.
Multiple prices per product (wholesale / retail / tiered)? Yes — keep several prices as separate Money fields on the product's category (e.g. Retail Price, Wholesale Price, Sale Price), then show whichever you want as columns, or build a separate price list per audience (one for retail, one for wholesale). Define the fields in Products → Categories → Fields; add them as columns in the Fields tab below. This is the V2 way to do what the legacy "different price fields" workflow did.
Step 1: Adding a Product List
Choose your starting point:
Method 1: Pre-Designed Layout
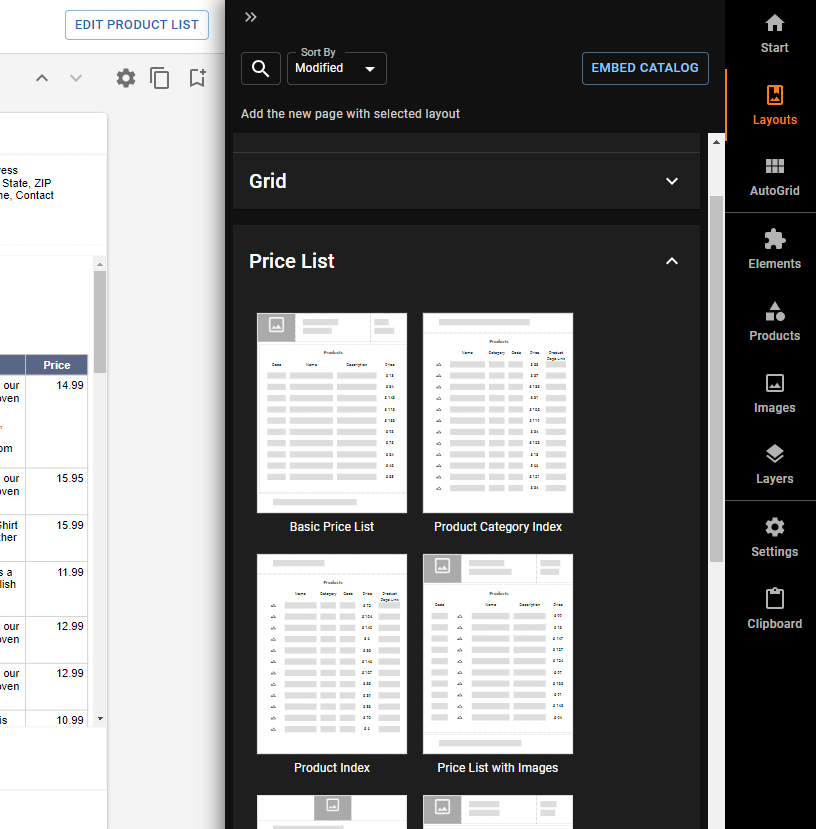
In the Catalog Designer, click Add → Layouts → choose a layout. Available pre-designed layouts:
- Basic Price List — simple product table with prices
- Minimalistic Price List — clean, minimal design
- Product Category Index — product index grouped by category with page links (for ToC/index pages)
- Product Index — alphabetical product list with page links
Customize any layout as needed.
Method 2: From Scratch
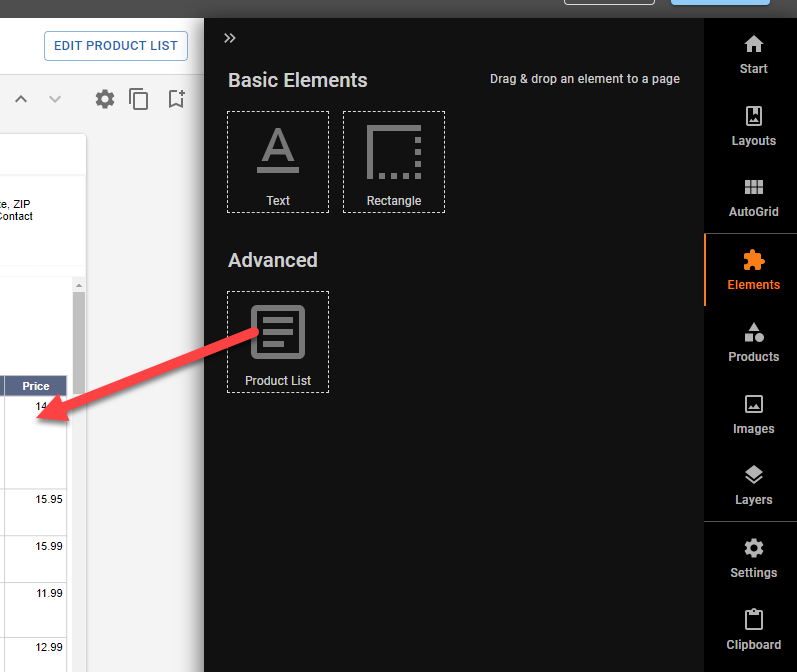
Drag and drop the Product List element onto a catalog page, then use the Product List Editor to configure.
Understanding the Two Methods
The two methods produce different editing experiences:
| Pre-Designed Layout | Product List Element | |
|---|---|---|
| What it creates | Text elements with HTML and product expressions | A configurable Product List object |
| How to edit | Double-click a cell → opens text editor with expressions like {{Name}}, {{Variants}}...{{/Variants}} | Double-click the element → opens Product List Editor with tabs (Products, Fields, Design) |
| Adding columns | Manually add HTML table cells with expressions | Check/uncheck fields in the Fields tab |
| Adding products | Edit expressions or duplicate rows | Select products in the Products tab |
| Variant handling | Use {{Variants}}...{{/Variants}} iterator in cell expressions | Toggle Separate Variant Rows in Design tab |
| Best for | Full design control, custom HTML layouts | Easy column/product management, auto-formatting |
Tip: If you double-click and see a text cursor with expressions (like
{{Name}}), you're using a pre-designed layout. If you see a popup editor with tabs, you're using a Product List element.
Step 2: The Product List Editor
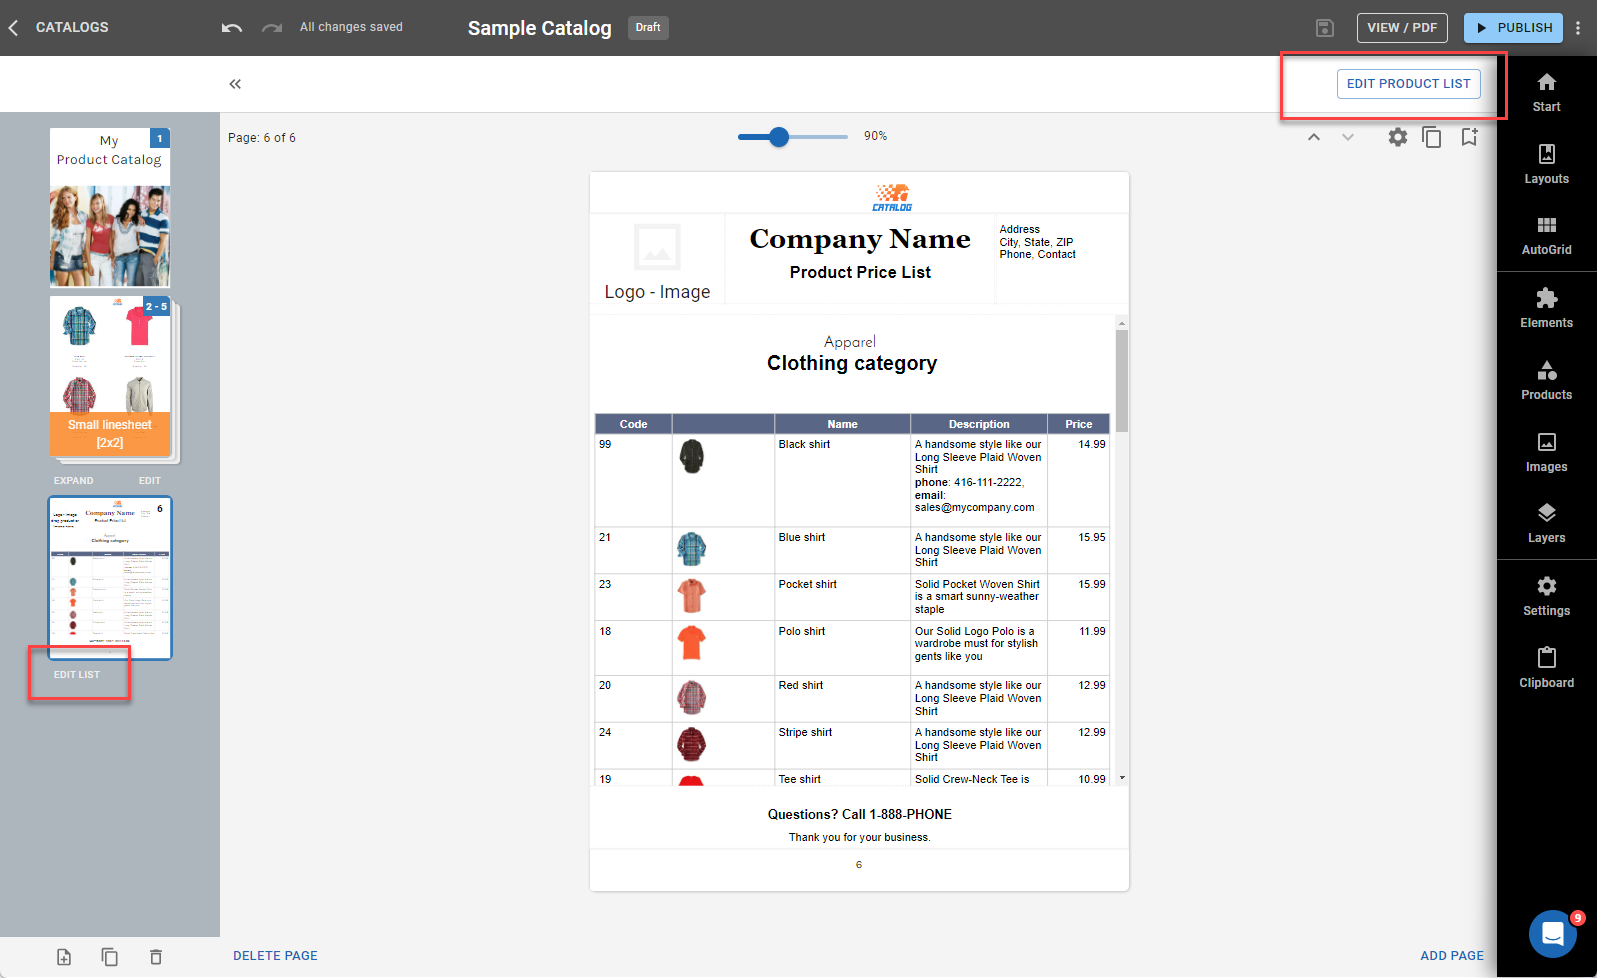
Double-click the product list element to open the editor, or click the Edit Product List button in the designer toolbar above the page — it appears whenever the current page contains a product list. Either way you get the same editor, with three tabs: Products, Fields, and Design.
You don't need to drag a new Product List element to change an existing one. Open the list that's already on the page.
Products Tab — Choose Your Products
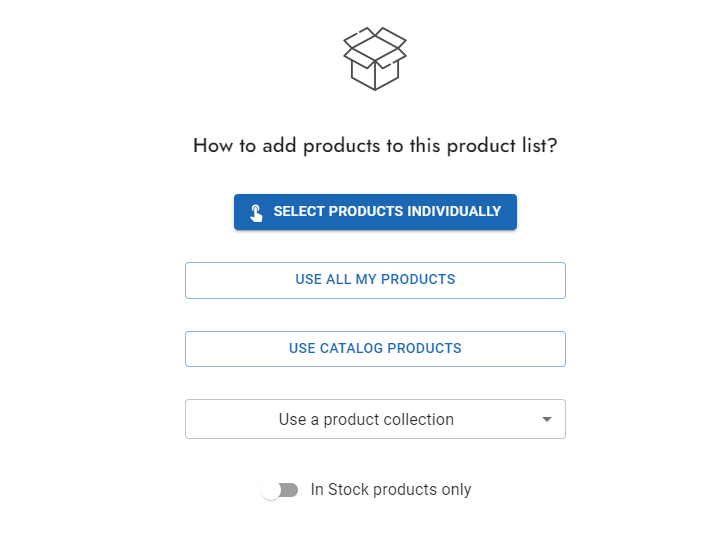
- Select products individually: Pick specific items (the button carries this exact label)
- Catalog Products: All products in the current catalog
- All My Products: Entire product database
- Collections: Use a single product collection (one collection per product list)
- Product Category: Use products from a specific product category
- In Stock Products Only: Toggle to show only items currently in stock
- The last four options auto-update as you manage your products
Multiple collections in one list? A product list can only use one collection as its source. To combine products from several collections, either: (1) create a parent collection containing all the products you want and use that, or (2) choose Select products individually as the source and add products by filtering by each collection in turn.
Fields Tab — Select Columns
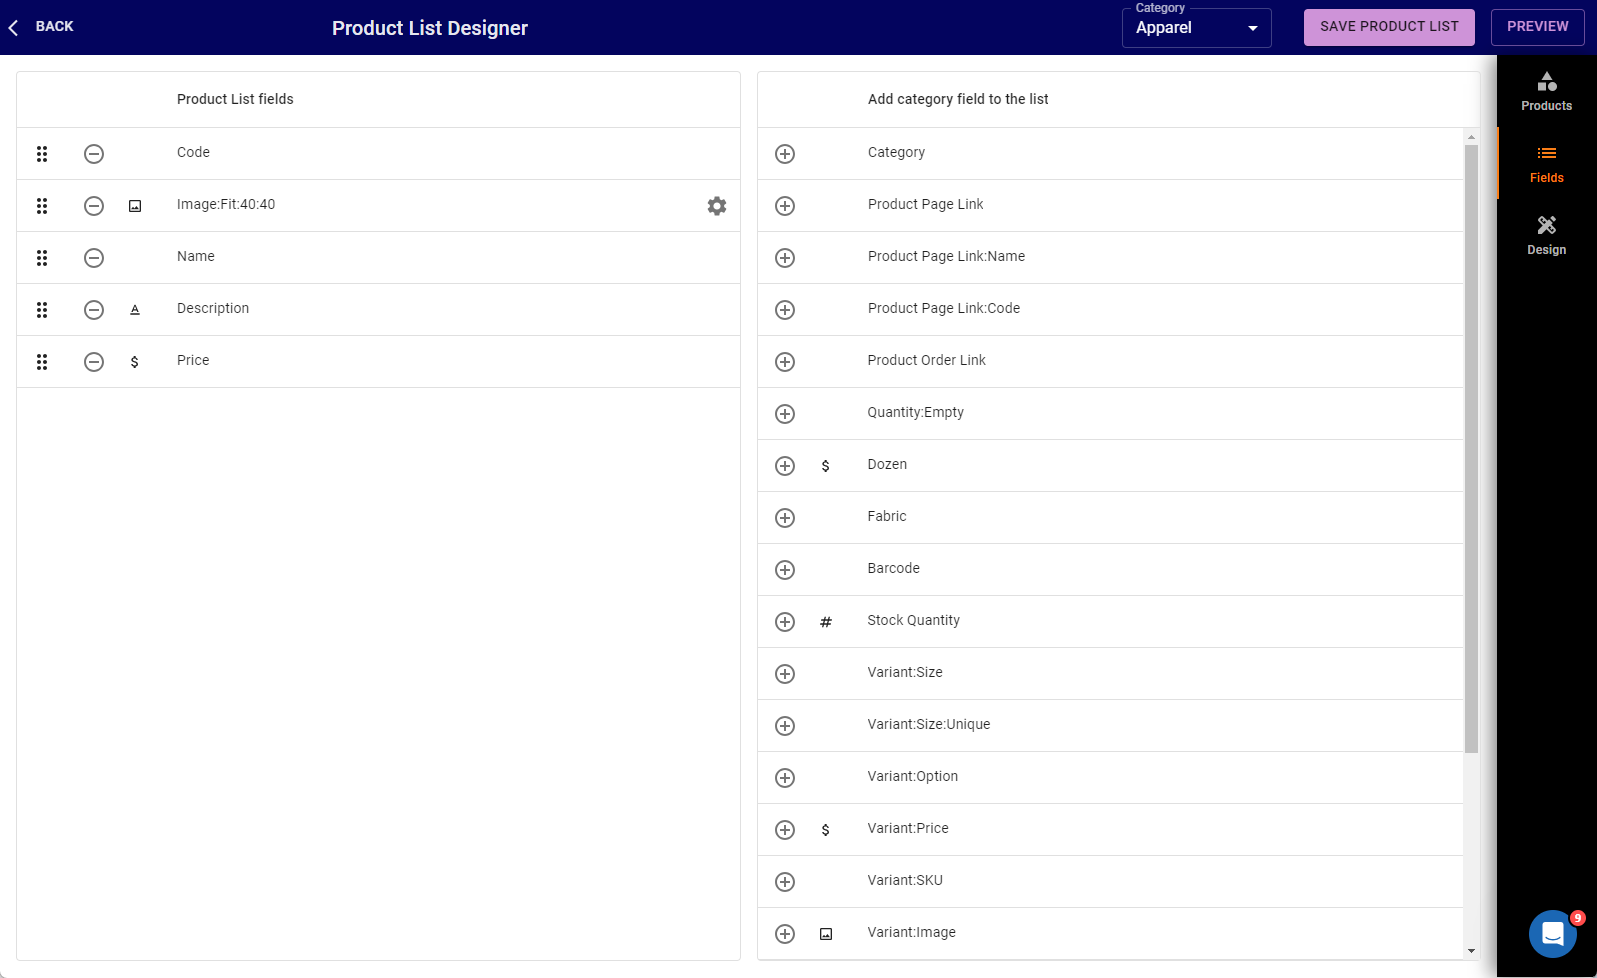
- Category Fields: Standard fields (Name, Code, Price, Description) and custom fields from your categories
- Special Fields:
- Image — the product image
- Product Page Link (also
:Name/:Codevariants) — clickable link to the page where the product appears in the catalog, used for index/ToC pages - Product Order Link — an Order link on every row, so customers can order that product straight from the list (see Clickable ordering below)
- Quantity — an empty quantity box on every row, for order forms
- Variant Fields: Display variant options as columns
- Barcodes: Add with
{{BarcodeImage}}or{{BarcodeImageExt}}
Clickable ordering — let customers order from the list
Ordering is a catalog-level switch plus a per-surface field. Both parts are needed:
- Turn on orders for the catalog. In the Catalog Designer open the catalog Settings → Orders and switch on Enable catalog orders. Optionally set an Orders Email to override the account default. (Catalogs imported from a Catalog Machine template may already have this on.)
- Make the products clickable, which works differently per page type:
- Product card pages — nothing to add. With orders enabled, every product on the page automatically gets a select checkbox and a quantity control in the online catalog.
- Product list / price list pages — add the Product Order Link field in the Fields tab. Every row then shows an Order link. Add the Quantity field too if you want customers to enter amounts.
Ordering only works in the online catalog, not in the PDF. The select controls and the Order link are interactive elements — they are absent from a downloaded or printed PDF, and the Product Order Link column renders empty there. Share the catalog link (or the showroom) when you want customers to order.
A catalog in Draft status is visible only to you while you're signed in. Publish it before sending the link to customers.
For the order form fields, notification emails, and Stripe payments, see the Online Orders & Payments article. Showrooms have their own separate orders setting.
Design Tab — Styling & Structure
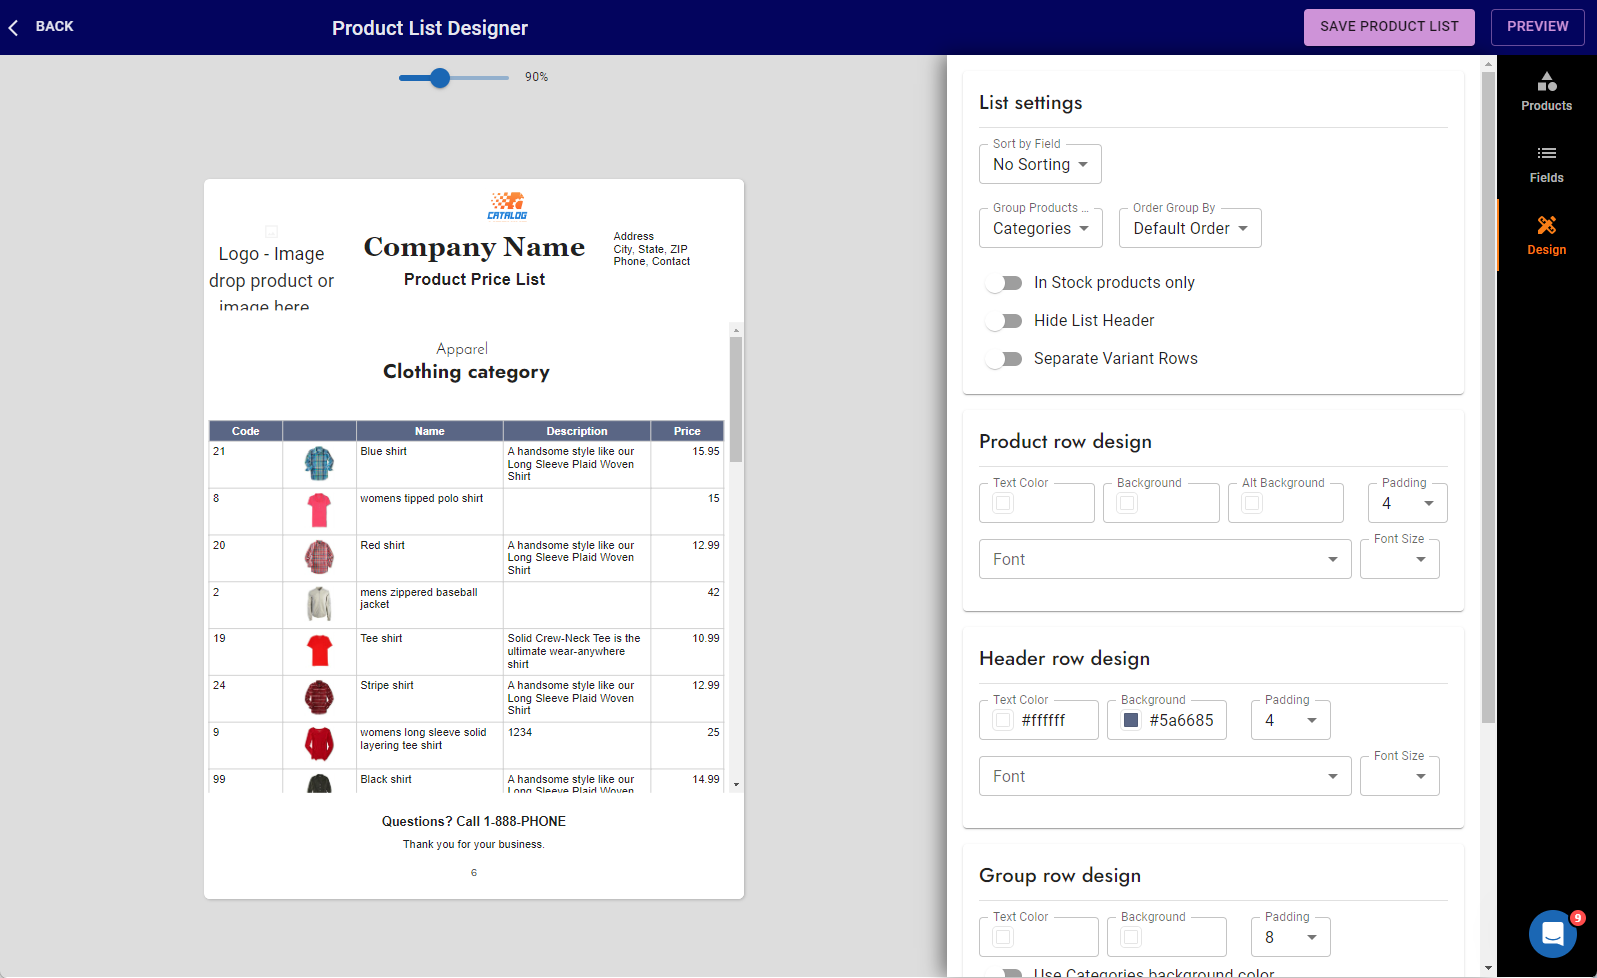
List Settings
| Setting | Purpose |
|---|---|
| Sort by Field | Sort products by any field (Name, Price, Code, etc.) |
| Descending order | Toggle sort direction |
| Group Products By | Group by Categories or Collections |
| Order Group By | Sort groups by Name or Rank |
| Hide List Header | Remove the header row entirely |
| Separate Variant Rows | Show each variant as a separate row |
Header Row Design
Customize the table header appearance:
| Setting | Default | Purpose |
|---|---|---|
| Text Color | #ffffff (white) | Header text color |
| Background | #5A6685 (dark blue-gray) | Header background color |
| Padding | 4px | Space inside header cells |
| Font | — | Header font family |
| Font Size | — | Header font size |
Tip: To change the header color, open the Product List Editor → Design tab → Header row design section → click the Background color picker.
Product Row Design
| Setting | Purpose |
|---|---|
| Text Color | Product row text color |
| Background | Product row background color |
| Alt Background | Alternating row background (even rows) |
| Padding | Space inside product cells |
| Font / Font Size | Product row typography |
Group Row Design (when grouping is enabled)
| Setting | Purpose |
|---|---|
| Text Color | Group header text color |
| Background | Group header background color |
| Use Category/Collection color | Auto-color groups from category/collection settings |
| Show Group Thumbnail | Display category/collection thumbnail image |
| Show Group Description | Display category/collection description text |
Cell Border
| Setting | Options |
|---|---|
| Style | None, Grid, Bottom |
| Color | Border color (when style ≠ None) |
Step 3: Advanced Customization with HTML & Expressions
After the Product List is generated, you can customize it further by editing the text directly or switching to HTML code view.
Edit Text Directly
Click on any text in the generated list to modify field labels, headers, or content.
HTML Editing
For full control, switch to code view (code button in text editor toolbar) and edit the HTML. You can use product expressions inside the HTML:
Common expressions in product lists:
{{AltRow}}— flag for even rows (use for alternating row styles in CSS){{IsFirst}},{{IsLast}}— first or last product flags{{If Price > 0}}${{Price}}{{Else}}N/A{{/If}}— conditional display{{Price:#,###.00}}— price formatting{{Calc: Price * 1.13}}— calculated values (e.g., tax-inclusive price){{Image:Fit:50:50}}— product image sized to fit
Example: Custom HTML table with expressions:
<!--{{Categories: ProductCount > 0}}-->
{{Name}}
<table>
  <tr>
    <th>Name</th>
    <th>Price</th>
    <!--{{Options}}-->
    <th>{{OptionTitle}}</th>
    <!--{{/Options}}-->
  </tr>
  <!--{{Products}}-->
  <tr>
    <td>{{Name}}</td>
    <td>${{Price:#,###.00}}</td>
    <!--{{Options}}-->
    <td>{{Variants}}{{OptionValue}}{{/Variants}}</td>
    <!--{{/Options}}-->
  </tr>
  <!--{{/Products}}-->
</table>
<!--{{/Categories}}-->
Example: Alternating row colors with CSS:
<tr style="background-color: {{If AltRow}}#f5f5f5{{Else}}#ffffff{{/If}}">
  <td>{{Name}}</td>
  <td>{{Price}}</td>
</tr>
For full expression reference including iterators, conditions, sorting, and formatting, see the Product Expressions article.
Step 4: Using Lists in Layouts
- Reusable Layouts: Save product list pages as layouts to reuse across catalogs
- Save Pages: Convert any catalog page to a reusable layout
Common Questions
Q: My whole product list is on one page — how do I split it across multiple pages so I can print it? A: A long product list automatically flows across multiple pages in the downloaded PDF and when printed — there's nothing to set up. The online preview shows the list as one long scrolling page, which is normal and does not mean it won't paginate. To see and print the paged version, use Download → PDF (or your browser's Print). If rows look overcrowded on a page, reduce the Font Size or Padding under the Design tab so more rows fit cleanly.
Q: How do I re-open the Product List Editor? A: Easiest way: click the Edit Product List button in the designer toolbar above the page — it's there whenever the page has a product list. Otherwise click the outer edge/border of the Product List element (not inside a cell) to select the entire element, then double-click it. You should see selection handles around the whole table. If double-clicking opens a text cursor instead, you're using a pre-designed layout (see "Understanding the Two Methods" above) — edit the expressions directly in the text editor or switch to code view. Don't drag in a new Product List element to edit an existing one.
Q: How do I add clickable ordering to all my products? A: Two steps. First switch on Enable catalog orders in the catalog's Settings → Orders. Then: on product card pages every product becomes selectable automatically, with a quantity control; on product list pages open the Product List Editor → Fields tab and add Product Order Link (plus Quantity if you want an amount box). This works in the online catalog only — the controls do not appear in the PDF. See Clickable ordering above.
Q: I added Product Order Link but the Order link is missing. A: Check three things: (1) Enable catalog orders is on for that catalog, (2) you're looking at the online catalog, not the PDF or print view — order links never render in PDF, and (3) the catalog is Published if you're testing the link as a customer rather than signed in as the owner.
Q: How do I add a new field (e.g., from CSV import) to my product list?
A: Product List element: Double-click to open the editor → Fields tab → check the new field. Pre-designed layout: Double-click a cell → switch to code view → add the expression (e.g., {{NETT Price}}) in a new <td> cell. Make sure to add a matching <th> header cell too. If the field doesn't appear, verify the CSV import created the field under your category.
Q: How do I change the header color? A: Open Product List Editor → Design tab → Header row design → click the Background color picker.
Q: How do I add alternating row colors?
A: In Product List Editor → Design tab → Product row design → set Alt Background color. Or use {{AltRow}} expression in HTML for custom styling.
Q: How do I hide the header row? A: Product List Editor → Design tab → toggle Hide List Header on.
Q: Can I show variant options as separate rows? A: Yes — Product List Editor → Design tab → toggle Separate Variant Rows on.
Q: How do I display group headers with category colors? A: Group by Categories or Collections, then enable Use Category/Collection color in Group Row Design.
Q: How do I show products from multiple collections in one price list? A: Product lists support one collection at a time. Two workarounds: (1) Create a parent collection that includes products from all the collections you need, then select that parent collection. (2) Switch to Select products individually source, filter by one collection in the right panel, add those products, then filter by the next collection and add more. Use Group Products By → Collections to keep them organized under collection headers.