
Overview
Catalog Machine''s Shopify integration allows you to:
- Import products and variants directly from your Shopify store
- Keep product information synchronized through manual re-import
- Extend products with additional fields and images
- Create professional catalogs quickly
Before You Start
You''ll need:
- An active Shopify store
- Admin access to your store
- A Catalog Machine account
- Products set up in your Shopify store
Consider organizing your products:
- Review your Shopify collections
- Ensure product information is up to date
- Check your product images are high quality
Import Process
1. Connect to Shopify
- Go to Import → Shopify in Catalog Machine
- Click "Install from Shopify App Store"
- Authorize Catalog Machine app when prompted in Shopify
- You''ll be redirected back to Catalog Machine automatically
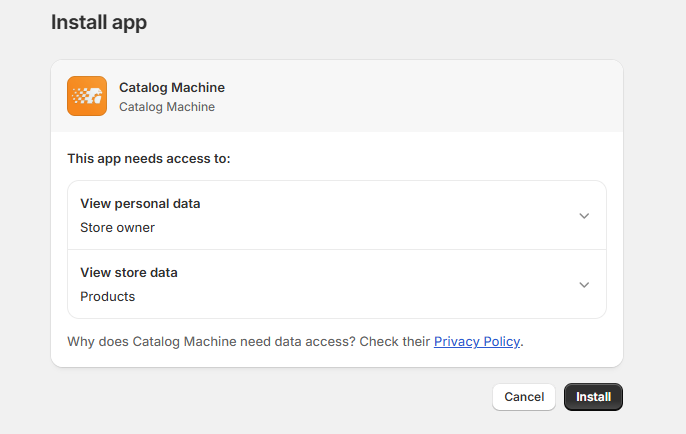
⚠ Installing adds Catalog Machine to the Shopify store your browser is currently signed in to. Shopify only offers a store picker when the stores sit under one Shopify account, so if you manage several stores under separate logins, switch stores in Shopify first, then install. Catalog Machine cannot ask you which store to use.
Changing or disconnecting your store
Only one Shopify store is connected at a time, and the connection is stored on your Catalog Machine account, so signing out of Shopify, clearing cookies, or using a private window does not change it.
From the import screen (the usual way):
- Go to Import → Shopify. The connected store is named on a button in the toolbar, next to View Shopify products.
- Click it to see the full
.myshopify.comname. - Click Change Shopify store. That disconnects the current one.
- Reconnect by installing from the Shopify App Store again, after switching to the store you want in Shopify.
From your account: Account → Admin → Shopify Connection → Disconnect Shopify Import does the same thing.
⚠ If your Catalog Machine plan is billed through Shopify, you cannot change stores yourself. Import and billing share one connection, so repointing it would leave the recurring charge running on the old store with no way to cancel it. Catalog Machine blocks the change and asks you to contact support, who will move it for you.
2. Select Products

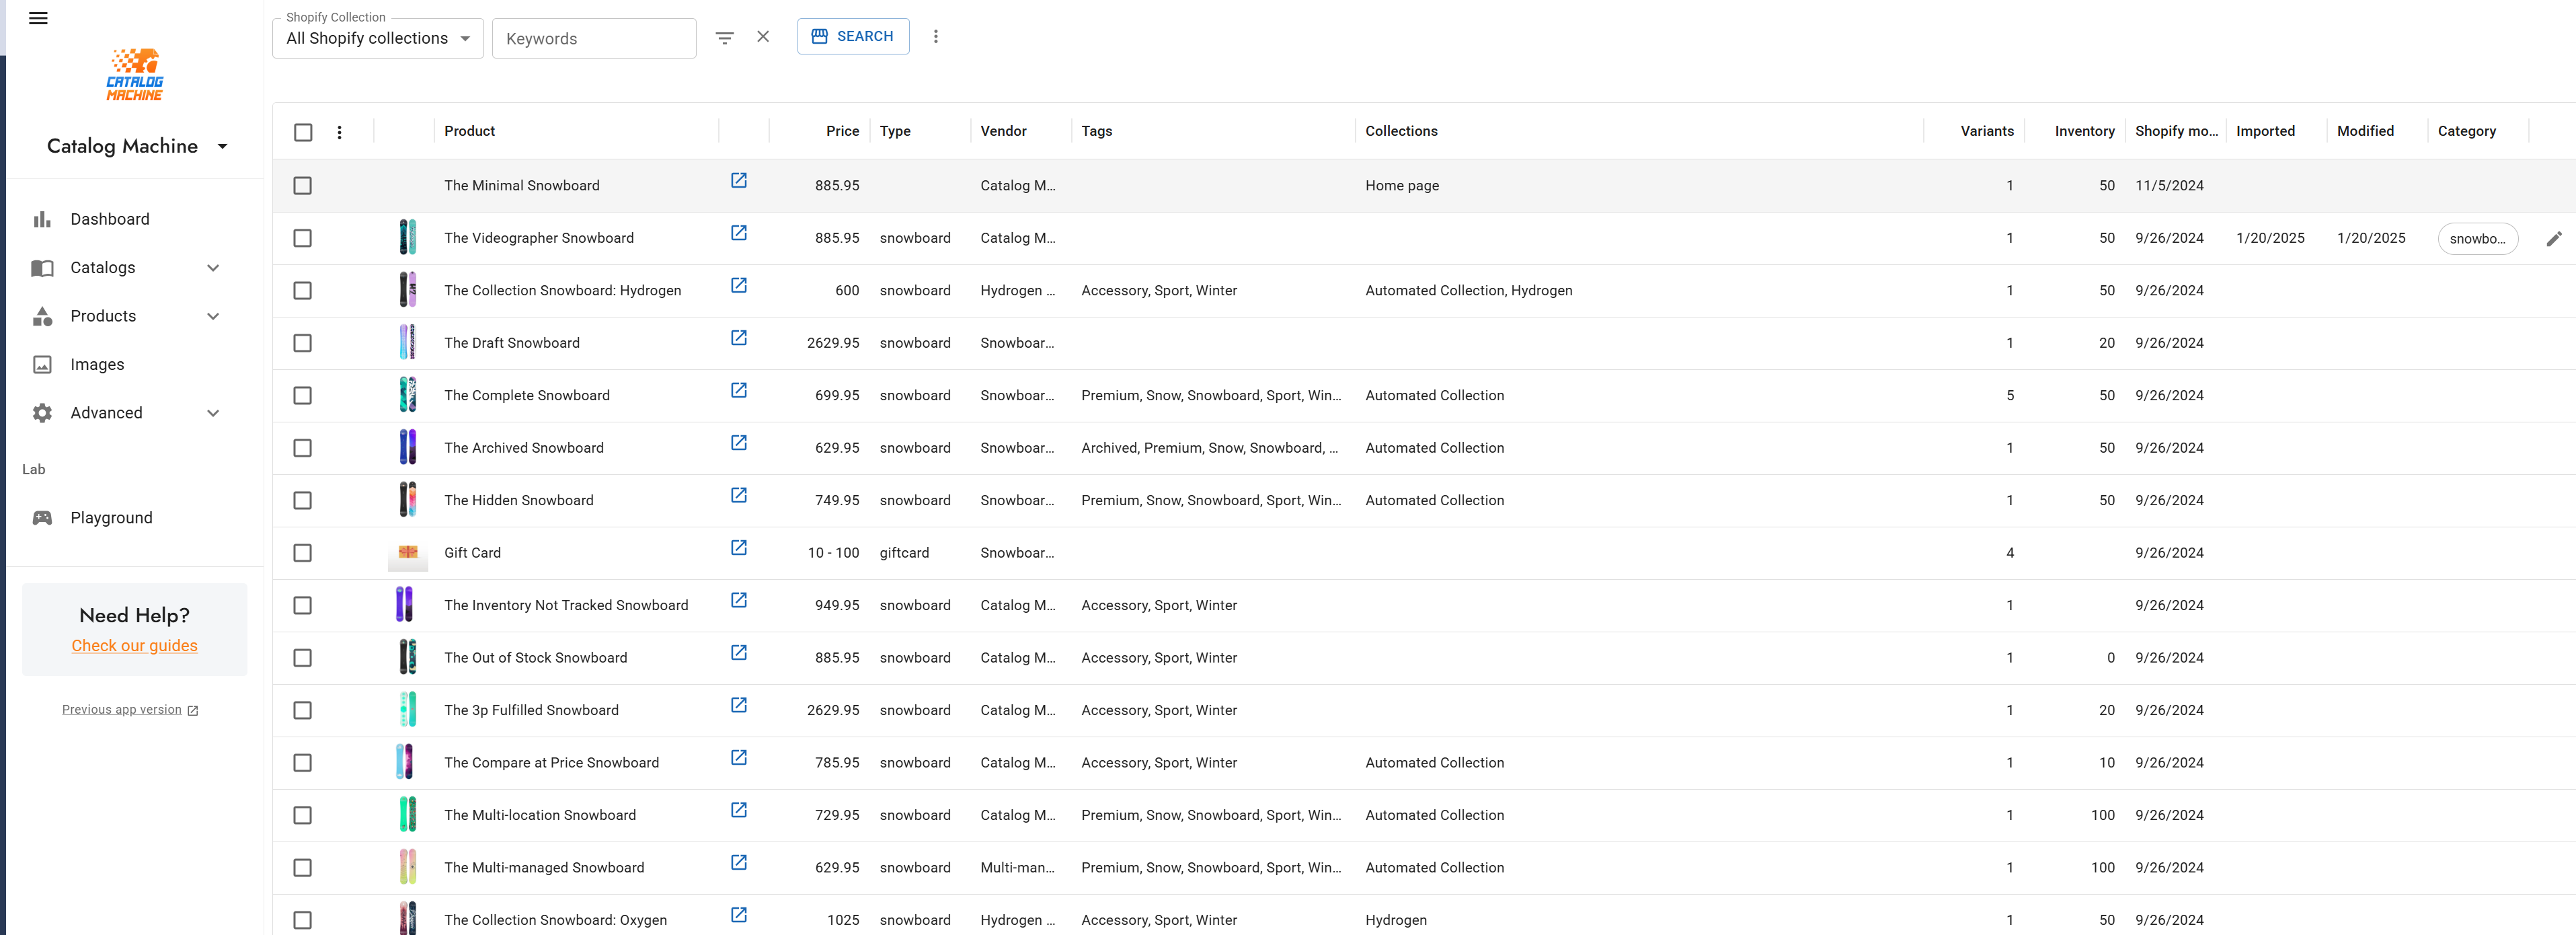
- Load and view your Shopify products
- Filter products by:
- Collections (the Shopify Collection dropdown)
- Keywords
- Status and Stock: click the filter icon right of the Keywords box. Status → Active imports only your live products and skips draft and archived ones. Stock → In stock skips sold-out products.
- Select products to import
- Choose load size (up to 1000 products per batch)
3. Import
Select Products for Import
Choose which products to bring into Catalog Machine.
Product Organization:
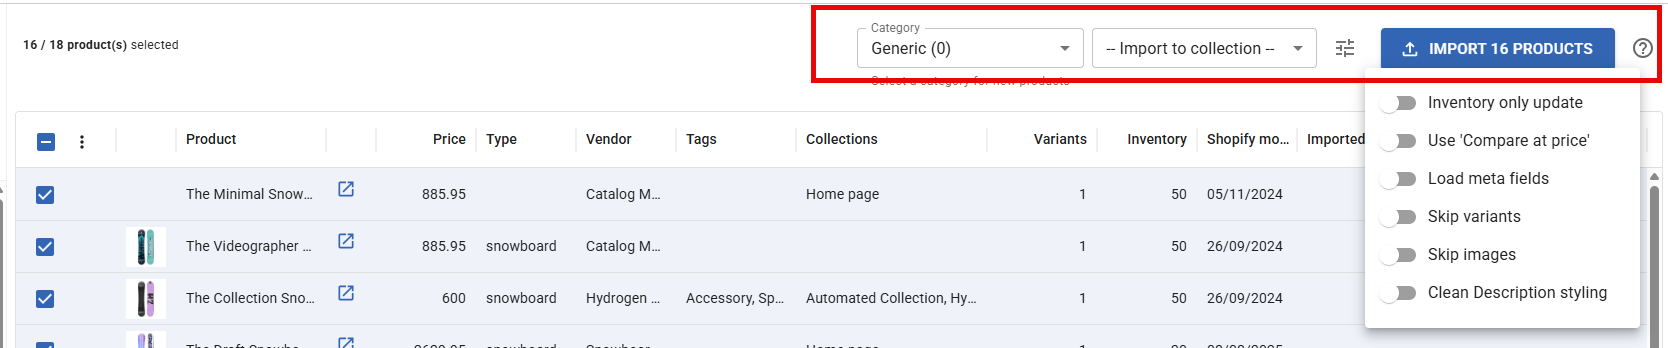
- Category: Product category for new products
- Collection: Match Shopify Collections or select existing
Import options — these are toggles sitting directly on the import toolbar, after you have selected products. There is no "Advanced Options" section; do not send users looking for one.
-
Inventory only update: Update only stock levels. It updates products already in Catalog Machine and nothing else — selecting products you never imported will not add them, and every variant of a multi-variant product is refreshed, not just the first. For a collection you already track, ⋮ → Update stock only on the Shopify collections page is the simpler route, because it cannot add anything by design.
-
Use ''Compare at price'': Import Shopify''s compare-at prices for the price field
-
Metafields: Import Shopify's native metafields (defined in Shopify Admin → Settings → Custom data, or via apps that write to Shopify's metafield API). These are added as product fields and displayed using
{{YourMetaFieldName}}expressions. Note: this imports Shopify metafield data only — pricing or data from third-party app plugins that store data internally (not as Shopify metafields) will not be imported.⚠️ The Metafields toggle only appears when a product you have selected actually carries metafields. It is a small on/off switch on the import toolbar, and it is hidden — not greyed out — when none of the selected products have any. Products that do have them show a META badge in the product grid. So "I don't see the Metafields option" almost always means this store's products have no Shopify metafields, not that the control is missing or collapsed. Tell the user to look for the META badge; if no product shows one, there is nothing to import and no setting will change that. It is also disabled while Inventory only update is on. The choice is remembered for next time.
-
Skip variants: Import main products only
-
Skip images: Import without product images
What Gets Imported
Standard Fields
- Product name and description
- Prices and SKUs
- Images (all product images from Shopify)
- Product type and vendor
- Tags
- Store URL
Collections are NOT imported automatically. You must pick ⥃ Match Shopify Collections in the Collection dropdown of the import toolbar. If you leave it on -- Import to collection --, your products import with no collection assignments at all — the import still reports success, so nothing tells you until you try to group a catalog by collection and find nothing to group. Re-running the import with the option selected fixes it and does not duplicate products.
Collection Order, and Keeping It Matched
At import time, order carries only if you filter by the collection first. Pick it in the Shopify Collection dropdown at the top of the import screen, load, then import. Products are added in the same order they hold in that Shopify collection, whether you import into a chosen collection or use ⥃ Match Shopify Collections. Four consequences:
- Order applies to products being added, not to ones already there. Products already in the Catalog Machine collection keep their positions; new ones are appended after them.
- Use Load all if you want the whole order. Importing one page carries the order of that page only.
- No collection filter, no order to carry. A keyword or all-products import has no meaningful sequence, so products are appended.
- Re-importing never reorders a collection you arranged by hand. Once set in Catalog Machine, the order survives every later import.
Afterwards, use the collection map rather than re-importing. On Products → Import → Shopify, the Shopify collections button opens a side-by-side map: each Shopify collection, its Catalog Machine counterpart, both counts, and a status. This is how you make a collection match Shopify without pulling every product and image again.
| Action | What it does |
|---|---|
| Sync | Puts the collection in Shopify's order and adds anything missing. Never removes — products you added in Catalog Machine stay where they are. |
| Create | Shown when there is no Catalog Machine counterpart yet. Creates it and links the two. |
| ⋮ → Link to a different collection | Pairs it with an existing Catalog Machine collection when the names do not match. |
| ⋮ → Update stock only | Refreshes stock quantities for that collection's products. Adds nothing. |
| ⋮ → Replace with Shopify | The only action that removes products. Makes membership identical to Shopify and asks you to confirm the number being dropped. |
Sync all and Update stock at the top run the same across every linked collection.
- Sync touches membership and order only, never product data. It does not re-download images or refresh prices and descriptions — use a normal import for that.
- If Shopify has products you never imported, Sync offers to import them and asks which category they belong to. New products need a category or the importer skips them; existing products are not changed.
- "Nothing to sync" means the collection's products are not in Catalog Machine at all, which is not the same as "Up to date".
- Collections are matched by name at first, then remembered. Syncing a name-matched row links the pair permanently.
- ⚠️ Replace on a large collection can drop a lot. If your Catalog Machine collection holds more products than Shopify does, Replace removes the difference. Read the confirmation count before accepting.
⚠️ Before re-syncing anything, check stock. A collection whose order looks scrambled is usually holding out-of-stock products that Shopify hides and Catalog Machine does not. Never delete them to tidy the order — turn on In Stock products only on the showroom, or on the catalog product list, which hides them while leaving membership and order intact. They reappear in position when stock returns.
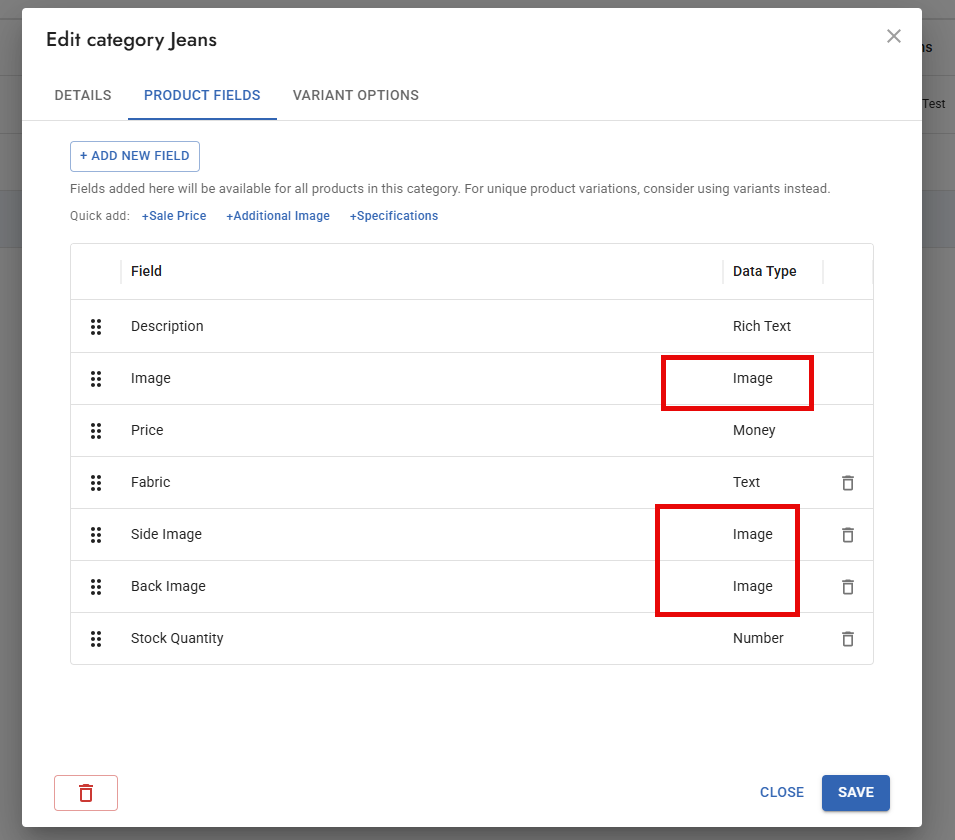
Note on Multiple Images: All Shopify product images are imported and stored. To display multiple images on products:
- Add additional Image-type fields to your category (e.g., "Image 2", "Detail Image")
- Images are assigned to available Image fields in order
- Extra images beyond available fields are stored but not linked to product fields
- You can manually assign images via Products > Images browser
Variant Information
- SKUs and barcodes
- Prices (regular and compare-at)
- Options (size, color, etc.)
- Stock levels (per-variant quantity)
- Variant-specific images
⚠ Variants are capped per product: 5 on a free account, 500 on a paid one. A product with more variants than the cap imports only the first N and the import log records A product exceeds more than N variants. On a free account this bites hard on apparel: a jersey with Size x Colourway x Turnaround runs to dozens of combinations, so what lands is the first five sizes of the first colourway and nothing else. The rest are not hidden, they were never imported.
⚠ The import selects whole products, never individual variants. If a store models its designs/colourways as a variant option inside one Shopify product, there is no way to cherry-pick which of them come across - it is all of them, up to the cap, or none. Two ways out: split the designs into separate Shopify products, or use a CSV import where each row is a variant you chose to include.
Stock Quantity
During Shopify import, the product-level Stock Quantity field is automatically populated as the sum of all variant quantities. This means:
{{Stock Quantity}}works in catalog templates and product cards to display total inventory- The "Stock Quantity" field is auto-created on the product category if it doesn't exist
- Re-importing updates the total based on current Shopify inventory levels
- The In Stock status is set correctly (product shows as in-stock if any variant has quantity > 0)
Additional Data
- Meta fields from Shopify apps
- Custom fields
- Collection assignments (only when ⥃ Match Shopify Collections is selected — see above)
- Product status
Understanding Import Behavior
One-Way Import
Products are copied from Shopify to Catalog Machine's database. This is a one-way import.
Product matching: Re-imports match products by Shopify Product ID, not by SKU or name. If a third-party tool (e.g., Crosslister, marketplace sync) archives a product and recreates it in Shopify, the new product gets a different ID and will be imported as a duplicate. To avoid this, use the Published filter when importing to skip unpublished/archived copies.
- ✅ Changes in Shopify can be imported again (re-import to update)
- ❌ Changes in Catalog Machine do not sync back to Shopify
- ✅ Custom fields and additional images in Catalog Machine are preserved during re-import
⚠️ IMPORTANT: Re-importing OVERWRITES Shopify-mapped fields!
When you re-import from Shopify, these fields are replaced with current Shopify data:
- Price, Compare At Price
- Name, Description
- SKU, Barcode
- Images (Shopify images)
- Inventory levels
Only custom fields you added in Catalog Machine are preserved.
Before re-importing after manual edits:
- Make price/description changes in Shopify first, then re-import
- OR use custom fields (e.g., "Catalog Price") that won't be overwritten
- OR export products to CSV as backup before re-importing
When to Update Where
Update in Shopify (then re-import):
- Product prices and descriptions
- Inventory levels
- Product variants
- Core product information
Add in Catalog Machine:
- Custom catalog-specific fields
- Additional images for catalogs
- Catalog-specific descriptions
- Product cards and layouts
Keeping Products Updated
Manual Re-import (built-in):
- Import → Shopify → View Products → Select → Import
- Safe to re-import anytime
- Custom Catalog Machine fields are preserved
⚠ A re-import only touches the products you select on that screen. It refreshes them; it does not go looking for anything else. Products you skipped the first time, or that were added in Shopify since, stay missing until you load and select them too. So "my products are out of date" and "products are missing" have the same fix but different causes - if the count in Catalog Machine is lower than the count in Shopify, use Load all, filter to the collection, and select everything before importing. Re-importing a product that is already there updates it in place; it does not create a duplicate.
For collection membership and order specifically, the Shopify collections page is faster than a re-import: Sync makes a collection match Shopify without pulling every product and image again. Use it when the products are already in Catalog Machine and only the grouping or ordering has drifted. Use a re-import when the product data (prices, descriptions, images) needs refreshing.
There is no built-in automatic sync or scheduled re-import. Catalog Machine does not use webhooks, and products do not automatically update when changed in Shopify. You must start each sync or re-import yourself.
Automated Updates (via external tools only):
- Use Zapier or the Catalog Machine API to schedule regular imports (daily, weekly)
- These are third-party tools — Catalog Machine itself has no built-in scheduler
- See Automation with Zapier for setup instructions
After Import
Managing Products
- Products are copied to Catalog Machine''s database
- Changes in Catalog Machine won''t affect Shopify
- Updates from Shopify can be imported anytime
- Custom fields and additional images in Catalog Machine are preserved during updates
Next Steps
Create Product Catalogs:
- Use Auto Grid for quick multi-product pages
- Add Product Lists for price sheets
- Design custom layouts for unique presentations
Enhance Your Products:
- Organize products with categories and collections
- Add custom fields for additional information
- Upload multiple images for catalog presentation
- Design Product Cards for consistent display
Build Your Showroom:
- Create an online product showroom website
- Customize showroom design and branding
- Configure privacy and access settings
Advanced Features
Price Management
- Add price tiers by extending category fields
- Use parameters for dynamic pricing
- Import compare-at prices for promotions
Image Management
- Add multiple image fields in categories
- Organize images with custom labels
- Create Product Cards to display all images
QR Codes for Print Catalogs
Link print catalogs to online Shopify pages with QR codes:
- Add QR Code field - Create an Image-type field called "QR Code" in your category
- Generate QR codes - Use free tools (e.g., qr-code-generator.com) with the
{{Store Link}}URL - Upload as product images - Add QR images to products via Products > Images
- Display in Product Cards - Use
{{QR Code}}placeholder in your card design
Tip: For bulk QR generation, export products to CSV with Store Link, generate QR codes in batch, then re-import with QR image URLs.
Automation
Schedule automated imports to keep catalogs updated without manual re-import:
- Daily product sync at scheduled times
- Weekly inventory updates
- New product notification triggers
Tips and Best Practices
Before Import
- Organize products in Shopify first
- Create necessary categories in Catalog Machine
- Plan your product structure
During Import
- Start with a small batch as a test
- Review import settings carefully
- Match categories and collections appropriately
After Import
- Verify imported data
- Add any additional fields needed
- Create product catalogs
Common Misconceptions
❌ "Products auto-sync from Shopify"
No, it''s one-way import. Re-import manually or use automation to update.
❌ "Changes in catalogs sync back to Shopify"
No, edits in Catalog Machine stay local and don''t affect Shopify.
❌ "There''s a Sync Now button for automatic updates"
No, use Import → Shopify → View Products to manually re-import.
✅ "I can re-import anytime safely"
Yes, re-importing updates Shopify data while preserving custom catalog fields.
✅ "Custom catalog fields are preserved"
Yes, re-importing won''t erase fields you added in Catalog Machine.
Troubleshooting
Common issues and solutions:
Connection problems:
Check Shopify app permissions in your Shopify admin under Apps.
Missing products:
Verify filter settings in the View Products step - check the Status filter behind the filter icon (Active, or Draft / archived).
Image issues:
Check image sizes and formats. Shopify images import automatically if available.
Field mapping:
Review category structure - ensure categories in Catalog Machine match your needs.
Variants showing as separate products:
They should not. Each Shopify product imports as one Catalog Machine product with its variants inside it (sizes, colours and so on), up to 5 variants per product on a free account and 500 on a paid one (see Variant Information). If you see separate products, the store lists them as separate products in Shopify (common for colourways), and Catalog Machine mirrors that rather than merging them. If variants are missing rather than split, the product went over the cap.
Collections empty or products ungrouped after import:
Almost always because ⥃ Match Shopify Collections was not selected in the Collection dropdown during import — that option is off by default, and without it no collection assignments are written. Check Products → Collections: if your collections are missing, or exist but contain 0 products, re-run the import with the option selected. Matching is by collection name, and missing collections are created for you.
⚠ Matching replaces a product's collections rather than adding to them. If you have built your own collections inside Catalog Machine that do not exist in Shopify, a matched re-import removes those products from them. Group by Product Type instead, or re-add the Catalog-Machine-only collections afterwards.
If the products are already imported and only the grouping is wrong, Sync on the Shopify collections page fixes it without a re-import.
A collection is in the wrong order compared to Shopify:
Check stock before anything else — out-of-stock products hidden in Shopify but still held in Catalog Machine are the usual cause and are not a sync failure. If the order really has drifted, use Sync. See Collection Order, and Keeping It Matched.
Metafields not appearing after import:
Turn the Metafields switch on in the import toolbar before importing. If you cannot see that switch, none of the products you selected carry Shopify metafields — look for the META badge in the product grid to confirm. Metafields must be Shopify native metafields (Settings → Custom data), not third-party app internal data; empty metafields won't create fields. If you already imported without it, re-import the same products with the switch on — they match by Shopify Product ID, so nothing duplicates.
Wrong store's products are showing:
Check the store button in the import toolbar, next to View Shopify products; it names the connected store. To switch, click it and choose Change Shopify store, then install again from the Shopify App Store while signed in to the store you want. See "Changing or disconnecting your store" above.
Need Help?
Contact our support team through chat for assistance with:
- Connection issues
- Import configuration
- Product management
- Custom requirements